Posts

Showing posts from September, 2024

Day 30 of 30 Days of Halloween/Autumn Cards | Pop-Up and Twist Panel Halloween Card

Image
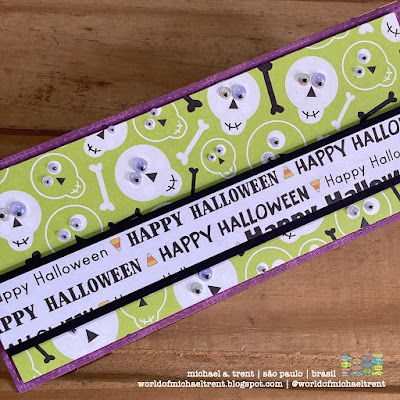
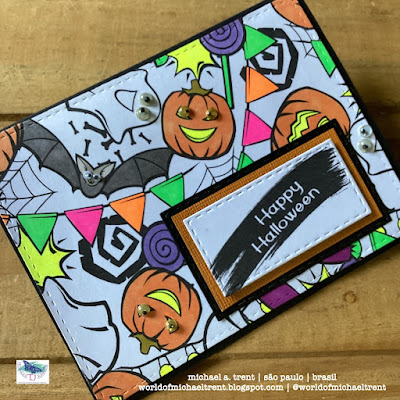
Hello everyone and welcome to  Day 30 of my 30 Days of Halloween/Autumn Cards. Today I have, what I think is, the best and most fun card I have made for this series.  Today's card is called a "Pop Up and Twist Panel Card" and, to be honest, I have wanted to make this card for a year but always felt intimidated by it.     I don't have a step-by-step for this card because I made it after watching THIS video on YouTube.  You will need a sheet of 12x12 solid colored cardstock or 2 sheets of 8.5" x 11" or A4 cardstock, and 1 or 2 sheets of scrapbook paper.  Super simple.   I used the same papers I used for yesterday's card but this card has skulls and bones on a purple background, not green. The only thing I did differently than the video is I made my card a 2 layer card, not 3 as in the video, to reduce the bulk of the card and I glued googly eyes to the skulls for a more fun effect.  Here is the card when you open it up.   Day 3...

Day 29 of 30 Days of Halloween/Autumn Cards | Halloween Slimline Card Using 2 Sheets of Paper

Image
Hello everyone and welcome to  Day 29 of my 30 Days of Halloween/Autumn Cards.  Today I made a slimline card using only 2 double-sided sheets of paper from my stash.  One paper had a purple side/skulls side, and the other paper has Happy Halloween all over it so there is no need for a sentiment.       If you want to make this card or one like it, here is what I did: Using black cardstock, I made a top-folding slimline card base - 3 5/8" x 8 5/8". I used a stitched slimline die to die-cut a piece from the purple side, which I then adhered to my card front.   Using the other side of the paper - with the skulls and bones - I cut a piece 3 3/8" x 8 3/8", adhered it to a piece of black fun foam, and then to the card front.   Using the paper with Happy Halloween all over it, I cut a piece 1" x 8 3/8", layered it on a piece of black cardstock, 1.25" x 8 3/8", layered it on a piece of black fun foam, and then to the card front.  Lastly...

Day 28 of 30 Days of Halloween/Autumn Cards | Digital Cats | 3 Happy Catoween Cards

Image
  Hello everyone and welcome to  Day 28 of my 30 Days of Halloween/Autumn Cards. Today I have 3 Halloween cards I made using Halloween Cats Digitals from Lady Stella Creates on Etsy .  These were so easy to use - hardly any coloring - and you can make all 3 cards in less than 10 minutes.     If you want to make this card or one like it, here is what I did: I made 3 top-folding A2 card bases using black cardstock.   I die-cut 3 pieces of Halloween paper from my stash using a 4.25" x 5.5" stitched rectangle die and adhered one to each card front.  I die-cut a piece of either orange or black cardstock using a 3.75" x 5" stitched rectangle die and adhered one to each card front.  I pulled the 3 cat images from Halloween Cats into my graphics program, added the Happy Catoween sentiment under each one, printed them on white cardstock, die-cut each one using a 3.25" x 4.5" stitched rectang die, colored them in using a yellow and orange marker...

Day 27 of 30 Days of Halloween/Autumn Cards | Hexagons from Hero Arts | Spellbinders

Image
  Hello everyone and welcome to  Day 27 of my 30 Days of Halloween/Autumn Cards.  I used 2 retired hexagon stamps from Hero Arts -  Hexagon Background  and  Alphabet Hexagons for today's card .  Although both are retired, you can still find them online by either clicking the links I provided on their names or by doing an online search for the name of the stamp.  Both are very cool.    If you want to make this card or one like it, here is what I did: I made a top-folding A2 card base using black cardstock.  Then I  die-cut a piece of white cardstock using a 4" x 5.25" stitched rectangle die and adhered it to the inside for a message. I stamped the Hexagon Background stamp on white cardstock using Onyx Black Versafine Ink and embossed it with the Hero Arts Clear Embossing Powder .     I then colored the image using ultra-fine tip markers in Halloween colors.   I stamped and embossed the word "happy" from...

Day 26 of 30 Days of Halloween/Autumn Cards | Halloween Digi Stamp | Littles Printables

Image
  Hello everyone and welcome to  Day 26 of my 30 Days of Halloween/Autumn Cards. Today I have a Halloween card using a Halloween digi stamp I purchased from LittlesPrintables on Etsy.   I bought this image last year and it looks like it's no longer available to buy.  But, checkout their store because they have many other images you can use to make a card.       If you want to make this card or one like it, here is what I did: I made a top-folding A2 card base using orange cardstock.   I die-cut a piece of black cardstock using a 4" x 5.25" stitched rectangle die, which I adhered to the card front. I die-cut a piece of white cardstock using a 4" x 5.25" stitched rectangle die, stamped  Wicked Halloween  from Technique Junkies, and adhered it to the inside. I printed the Halloween image from Littles Printables - twice - on white cardstock and die-cut it using a die in my stash.   I colored one image in full using alcoho...

Day 25 of 30 Days of Halloween/Autumn Cards | Googly Eyes| Scrabble Tiles| Technique Junkies

Image
  Hello everyone and welcome to  Day 25 of my 30 Days of Halloween/Autumn Cards.  Today I have another Halloween card using another "non-Halloween stamp" - Stencil Rings from Technique Junkies - to turn it into one.      If you want to make this card or one like it, here is what I did.  This is NOT a 5-minute card.  LOL   I made a top-folding A2 card base using orange cardstock.   I die-cut a piece of white cardstock using a 4" x 5.25" stitched rectangle die, stamped Wicked Halloween in one corner, and adhered it to the inside. I stamped Stencil Rings on white cardstock, die-cut it using a 3.75" x 5" stitched rectangle die, layered it on a piece of black, and then the card front.   I adhered 3 Scrabble tiles - B-O-O to a piece of black cardstock and then to the card front.    Lastly, I glued a googly eye in the center of each of the stencil rings.        Day 18 done!  I...

Day 24 of 30 Days of Halloween/Autumn Cards | Halloween Background | Technique Junkies

Image
Hello everyone and welcome to Day 24 of my 30 Days of Halloween/Autumn Cards.  Today I have a  Halloween card I made using 3 stamps from Technique Junkies - Halloween Background  and  Halloween Paintstroke  on the front of the card, and Wicked Halloween as my sentiment on the inside of the card.   Other than the time to color some of the images, it's a fast card to put together.     If you want to make this card or one like it, here is what I did: I made a top-folding A2 card base using black cardstock.     I die-cut a piece of white cardstock using a 4" x 5.25" stitched rectangle die, stamped Wicked Halloween on it, and adhered it to the inside. I stamped Halloween Background on white cardstock, die-cut it using a 4" x 5.25" stitched rectangle die, colored some of the images using alcohol markers, layered it on a piece of black fun foam, and then to the card front.    I stamped Halloween Paintstroke on white ...

Day 23 of 30 Days of Halloween/Autumn Cards | Take Time to Watch the Leaves Turn | Technique Junkies

Image
Hello everyone and welcome to Day 23 of my 30 Days of Halloween/Autumn Cards.  Today I have 2 cards for autumn using a sheet of beautiful fall paper from a Brasilian company.  One card has 2 layers, the other has 3, and both share the same beautiful paper and the Leaves Turn sentiment from Technique Junkies.   If you want to make one of these cards, or one like it, here is what I did: I made two top-folding A2 card bases from 2 different tones of orange.   I then die-cut 2 pieces of white cardstock,  die cut them each using a 4" x 5.25" stitched rectangle die, and adhered 1 to the inside of each card - where a message can be written. I stamped Leaves Turn - twice - on white cardstock, die cut using a banner die, layered them on a piece of orange cardstock, and set to the side to use later.  Card No. 1 I die-cut a piece of the fall leaves paper using a 4" x 5.25" stitched rectangle die, adhered it to a piece of fun foam, and then to the card front....

Day 22 of 30 Days of Halloween/Autumn Cards | Spooky Googly Eyes | Happy Halloween

Image
  Hello everyone and welcome to  Day 22 of my 30 Days of Halloween/Autumn Cards. Today I have another Halloween card using lots of googly eyes.  Yes, I have a problem.  I was looking through my pile of Halloween papers and I came across one sheet that had eyeballs all over the front.  I have no idea what pad it's from but I knew I had to use it with my collection of googly eyes.   I made a top-folding A2 card base using black cardstock. I used my 4" x 5.25" stitched rectangle die to cut a piece of orange cardstock, which I adhered to the card front. Then I die-cut this scrap of Halloween paper using a 3.25" x 4.5" stitched rectangle die, adhered it to a piece of black fun foam, and then to the card front - on top of the orange cardstock.    I stamped Spidery Halloween , from Technique Junkies, on a piece of white cardstock, die-cut it with the same 4" x 5.25" stitched rectangle die, and adhered it to the inside.   To finish the card...

Day 21 of 30 Days of Halloween/Autumn Cards | Fluff Your Tutu for Halloween | Wicked | Technique Junkies

Image
  Hello everyone and welcome to  Day 21 of my 30 Days of Halloween/Autumn Cards.  Today I have another Halloween card that I made using 2 stamps from Technique Junkies  - just the tutu from  Fluff Your Tutu for the front of my card and  Wicked Halloween  for the inside.   Now, Fluff Your Tutu is not a Halloween stamp but I turned it into one.  The image of the tuto reminded me of the Wicked movie being released this year and by using just the image, I could make a Halloween card.  Here's how I did it -   I made a top-folding A2 card base using black cardstock. I used my 4" x 5.25" stitched rectangle die to cut a piece of purple Halloween paper, which I adhered to the card front. I used my 3.25" x 4.5" stitched rectangle die to cut a piece of orange cardstock, embossed it with an embossing folder, layered it on a piece of black cardstock, and then to the card front.  For my main image, I needed the tuto image from Fl...

Day 20 of 30 Days of Halloween/Autumn Cards | Using Danse Macabre Digi Halloween Paper on Cards

Image
  Hello everyone and welcome to  Day 20 of my 30 Days of Halloween/Autumn Cards. Today I have 4 Halloween cards I made using the 2 sentiments from   Shake, Set of 2 from Technique Junkies  and some dancing skeletons from the  Danse Macabre papers from Raven Printable Design on Esty. If you want to make these cards or one like it, here is what I did.   I made 4 top-folding A2 card base using black cardstock. I die-cut 4 pieces of white cardstock using a 4" x 5.25" stitched rectangle die and I stamped different Halloween sentiments on each one.  I used 3 from Technique Junkies  - Wicked Halloween ,  Spidery Halloween , and  No Skeletons .     I printed 4 of the papers, die-cut each of them using the same 4" x 5.25" stitched rectangle die, adhered them to a piece of black fun foam, and then to the card front.   I stamped the sentiments from Shake, Set of 2 on white cardstock, die-cut them using banner dies, ...

Day 19 of 30 Days of Halloween/Autumn Cards | Dancing Skeletons in My Closet | Technique Junkies

Image
  Hello everyone and welcome to  Day 19 of my 30 Days of Halloween/Autumn Cards. Today I have another Halloween card that I made using 3 stamps from Technique Junkies.  For the front of my card, I used Dancing Skeletons and part of No Skeletons and, for the inside, I used the other part of No Skeletons and Spidery Halloween .   If you want to make this card or one like it, here is what I did.   I made a top-folding A2 card base using black cardstock.   I stamped Dancing Skeletons on a piece of orange cardstock using Onyx Black Versafine Ink and heat embossed it using clear embossing powder.  Yes, you can use embossing powder with Versafine inks.  Then I die-cut the image using a 4" x 5.25" stitched rectangle die, adhered a piece of black fun foam to the back, and then to the card front. Before I could stamp the sentiments, I had to do some stamp surgery.  I wanted to use part of No Skeletons on the front of the card, and th...

Day 18 of 30 Days of Halloween/Autumn Cards | Scary Tree Branches with Eyes | Technique Junkies

Image
  Hello everyone and welcome to  Day 18 of my 30 Days of Halloween/Autumn Cards.  Today I have - yes - another Halloween card.  But - today I am using a stamp that would not typically be used for a Halloween card but I turned it into one.   I used the  Dotted Branches Background stamp for the front of my card and Spidery Halloween  for the inside sentiment.  Both of these stamps are from  Technique Junkies . As soon as I saw this stamp in my stash I knew I had to make it using googly eyes on each of the dots.  I think it looks cool, is not a typical Halloween card and, by the Scrabble tiles just makes it even more unique.   If you want to make this card or one like it, here is what I did.  This is NOT a 5-minute card.  LOL   I made a top-folding A2 card base using black cardstock.   I stamped the Dotted Branches Background stamp on light blue cardstock, die-cut the image using a 4" x 5....

Day 17 of 30 Days of Halloween/Autumn Cards | Wall of Gothic Skulls | Technique Junkies

Image
Hello everyone and welcome to  Day 17 of my 30 Days of Halloween/Autumn Cards.  Today I have another Halloween card that I made using the Gothic Skull Background for the front of my card and Wicked Halloween for the inside of the card.  Both of these stamps are from  Technique Junkies . If you want to make this card or one like, here is what I did.  I swear, this is a 5 minute card!   I made a top-folding A2 card base using black cardstock.   I stamped the Gothic Skull Backgtround stamp on light gray cardstock, die-cut the image using a 4" x 5.25" stitched rectangle die, adhered a piece of black fun foam to the back, and then to the card front.     I stamped  Wicked Halloween  on a piece of white cardstock, die-cut it with the same 4" x 5.25" stitched rectangle die, and adhered it to the inside.   Lastly, I glued tiny googly eyes to each of the skulls on the front of the card.  Of course, this is...

Day 16 of 30 Days of Halloween/Autumn Cards | A Wee Bit Wicked Square Cards | Technique Junkies

Image
Hello everyone and welcome to Day 16 of my 30 Days of Halloween/Autumn Cards. I found even more scraps from Halloween papers in my stash and made some small square Halloween cards using A Wee Bit Wicked for the front of each card and Spidery Halloween for the inside of each card - both stamps from  Technique Junkies .         If you would like to make any of these cards or some like them, this is what I did:  I made four top-folding card bases - 4.5" x 4.5".  Cut 4 pieces of white cardstock (or whatever color you want to use), 4.5" x 9", place the long side along the top of the scoring tool, and score at 4.5".  Burnish well.   Then I adhered a different piece of Halloween paper from my stash to the front of each one.  I stamped A Wee Bit Wicked  4 times on white cardstock, die-cut each of them using a stitched square die that measures a wee bit more than 3.5" x 3.5", and adhered a piece of white fun foam to the back...