Sunday, April 25, 2021

The Crafty Elves' Countdown to Christmas April 2021 Edition


Hello everyone and welcome to the April 2021 Edition of The Crafty Elves' Countdown to Christmas.  If this is your first time here, the Crafty Elves (Debra of "Meticulosity", Lisa of "Life of BZscrapper", and myself) make 4 Christmas/Holiday cards per month and post them to our blogs on the 25th of each month.  And, this month, we have a Special Guest Crafty Elf - Vanessa Osbourn - and she has an amazing card over on her IG page. 

And, since there is an amazing Spring into Christmas 2021 {BYSHC} Hop happening, these cards will also be entered there.  


Now...on to my cards for the month.  

Card No. 1


I found this Happy Hanukkah Script die in my stash and realized that I have not made a Hanukkah card in a few months and I decided to make one.  If you need to make cards for Hanukkah/Chanukah, this card is super easy to make.  All you need is dark blue paper, decorative paper, and the die!

  • I started by making a top folding A2 card from white cardstock to which I adhered a piece of dark blue cardstock.
  • I printed one of the designs from the Hanukkah Digital Paper from AMB Illustrations on Etsy and then I used a stitched rectangle die to cut it out.
  • In order to get the inlay, I placed the Happy Hanukkah Scrip die from Pretty Pink Posh where I wanted them on the decorative paper and ran it thru my die cutting machine.  I removed the die cut words, keeping all the small inlay pieces, and adhered the decorative paper to my card front.  
  • Next, I die cut the Happy Hanukkah Script die again but from the dark blue cardstock, adhering the letters into the front of the card and, where there was a cutout in the letter, I used the decorative paper piece. 
  • Lastly, I adhered a few dark blue and clear crystals to the card front.

 
Card No. 2 
 
 
For this card I used a new Christmas digi stamp I recently found on Etsy from the seller Babycakesdnd.  I just fell in love with this Elf on Lockdown digi stamp. 
  • I made a top-folding A2 card from white cardstock.
  • I printed two of the Elf image on to white cardstock and I printed one of the designs from the digital version of Hello Christmas paper pad from Carta Bella. I went with the light blue background with snowflakes.
  • Using Stitched Rectangles Set 1 Dies from Pink & Main, I used the largest to cut a piece of the decorative paper, which I adhered to my card front, and the next die down to cut out one of the elf images, which I adhered to a piece of fun foam and then to the card front.   
  • I colored the image using BIC Intensity Markers.
  • Then I decided I wanted some 3D so I colored the 2nd elf and the can of Lysal, fussy cut them and adhered them using foam tape.
  • Lastly, I stamped my sentiment, cut each of the words out and adhered with some foam tape and then I added some Stickles by Ranger to the image in some places.

 
Card No. 3


Christmas would not be Christmas without an ugly sweater card.  I have used this set before but never for a slimline card.  The bigger the card means more ugly sweaters!  

  • I made a top folding slimline card base from white cardstock to which I adhered Christmas decorative paper. 
  • Using one of the Slimline Stitched Rectangle dies from Pink Fresh Studio, I cut a piece of white cardstock.  
  • I used the Ugly Sweater Stamp set from Your Next Stamp to stamp a sentiment in the center and then the sweaters around the sentiment.  (I am going to stamp them again on decorative paper and adhere to the card front).
  • Next, I went thru my stash of paper and pulled out an old paper pad called Jingle by Lily Bee Design.  I stamped the sweaters on several of the pages, fussy cut them, and then I adhered them to the card front.
  • I then stamped the smaller images, colored them and then used the matching Ugly Sweater Die set to cut them out.  I adhered them to some of the sweater fronts. 
  • Lastly, I glued some crystals to the wreath and then used Stickles on the sweaters and the reindeer's nose and antlers.


Card No. 4


The other day I was on Etsy looking for some new Christmas/Holiday images and I came across a new store called Kinda Cute By Patricia and then I found THIS image of a snow couple in love and I had to have it!  I also wanted them to be in front of a night sky and I had in my stash this paper that I made years ago.  So I scanned it and printed it to use and had enough to make 2 cards - one vertical and one horizontal.
  • I started by making my top folding A2 card bases from white cardstock.
  • I printed the night sky background and used a stitched rectangle die to cut two backgrounds.
  • Using a scrap piece of white cardstock, I ripped along the edge to get a snowy look and adhered them to my card front trimming off any excess.
  • I printed the snow couple in the size I needed and had my Scan N Cut cut the image out.  Then I colored them with some markers and adhered them to the card front.  On the vertical card, I put some foam tape on the back to raise them up off the card front.  
  • I die cut the small star I had in my stash using silver glitter paper, adhered it and then stamped the sentiment.


I'd love to know if you have a favorite card.  I love them all this month and can't really pick a fav.  Have you started your holiday cards yet?  

Please remember to check out the other Crafty Elves to see what they have made for this month.  And don't forget our Special Guest Crafty Elf - Vanessa - to check out her card (it's quite beautiful).  

Debra's Blog - Meticulosity
Debra's IG Page - djdavison814

Lisa's Blog - Life of a BZscrapper
Lisa's IG Page - bzscrapper

My IG Page - worldofmichaeltrent

Vanessa's IG Page - vclaireo

Until next time...hugs from Brasil!

~Michael

Sunday, April 18, 2021

Paper Crafters Unite Against Racism


Hello everyone.  There is a huge Instagram hop happening today called Paper Crafters Unite Against Racism. Although I am not taking part in it (my own fault for not signing up in time), I wanted to show my support with the Paper Crafting community.

Racism in the USA and the world is out of control and really needs to be talked about.  No one is born racist. It comes from our upbringing.  I was taught to love people.  The color of their skin or where they were from was not important.  What was important was who the person was.  

We just need to talk to each other.  Start a dialogue. Educate ourselves.  Attend protests, if possible.  Try to be part of the change!

Anyway, at the end of this post is a screenshot of the crafters taking part in the hop if you want to stop by some or all of their Instagram pages to show support. 


For my card - I recently saw a quote that moved me.  "The heart never knows the colour of the skin." By Chief Dan George.  It stayed with me because it's so true.  No matter the color of your skin, we also all bleed the same color.  So I decided to use this quote with a heart stamp set I own. 

I started with a top folding A2 card base of black cardstock.  I wanted a black and white base to this card with a bit of color.    Then I cut two piece of white cardstock using a stitched rectangle die that measures 4" x 5.25".  One I adhered to the inside of the card base.


Using the other stitched rectangle white cardstock, I stamped 8 of the 9 hearts from the Hearts, Set of 9 stamp set from Technique Junkies.  I was able to stamp all 8 at the same time using my Misti.


I colored in the hearts using a variety of Tombow markers, added a variety of Stickles on each heart, and set it aside to dry.


While it was drying, I typed up the quote from Chief Dan George in Pages, printed it on white cardstock, die cut it using a stitched rectangle die, and then layered it on a piece of black cardstock with a tiny border.
 

Lastly, I adhered the colored image to the card front and then adhered the quote using foam tape.  


Done!  I hope you can take the time to check out the other paper crafters taking part in the hop.  

I'd love to know what you think of the card and, more than anything, I thank you for stopping by my blog today. Enjoy the rest of your Sunday and, until next time -

Hugs from Brasil!

~Michael  

Thursday, April 15, 2021

Did You Know That April is National Letter Writing Month


Did you know that April is National Letter Writing Month (NLWM)?  It is.  Really.  Trust me!  You can read all about National Letter Writing Month - the history, how you can participate, what you can do...all by clicking HERE.  You can also do a search for "National Letter Writing Month" and you will get lots of links and ideas. 

Even though the postal service here is horrible, I wanted to make some cards and promote NLWM. My friends Debra and Celeste also did a post about NLWM and snail mail.  Just click on their names to go over to their blog posts. 

It's also the start of a new 10-Day Coloring Challenge with TheDailyMarker.com and, since I have been up since 5am coloring these images, perfect timing! 


So...my cards...I used Scene It Snails from Bugaboo Stamps.  I printed 4 on a piece of A4 white cardstock.  Then I used a stitched rectangle die to cut 3 of them out leaving the 4th to be fussy cut.  

I made 3 top-folding A2 card bases from white cardstock.  Then I stamped the Sophisticated Shells background stamp (Create A Smile Stamps) on white cardstock in 3 different colors.  I used Amalgam Jet Black, Tangerine Twist, and Passionate Pink (all from Gina K Designs).  Then I cut them out using another stitched rectangle die.  I love how the shell background goes well with the shell of the snails.

Then I colored the images using a variety of Sharpie and BIC makers.  I think I might have gone too bright but, well, they are done!  And I was working early in the morn.  LOL

To finish off my first card - I layered the snail panel on to a piece of orange cardstock to match the ink.  Then I adhered it to the card front using foam tape.  I die cut a "hello" die from my stash in orange and black cardstock and adhered them under the image with the black offset under the orange.  Then some Glossy Accents on the eyes and the small dots in the center snail. 


To finish off my second card - I layered the snail panel on to a piece of pink cardstock to match the ink.  Then I adhered it to the card front using foam tape.  I stamped the "hello friend" under the image in black, added some Glossy Accents on the eyes, and finished off the card some some Stickles from Ranger on various parts of the images.    


To finish off my my last card - I colored the 4th piece, fussy cut the 3 snails and the flower and leaves and adhered them to the snail panel with foam tape.  Then I layered the snail panel on to a piece of black cardstock to match the ink, and adhered it to the card front using foam tape.  I used some fun washi tape from my stash under the snails  and then added some Glossy Accents on the eyes and a Wink of Stella Clear Brush pen on the images to give some shimmer. 

I hope you enjoyed these 3 card ideas.  I loved coloring early in the morn with some hot coffee on the veranda.  Good way to start the day!  Do you have a favorite?  I am partial to the last card with the fun washi tape.  

Enjoy the rest of your day and stay safe.  Until next time!

Hugs from Brasil. 

~Michael

Happy Birthday To Misty with Anthony's Paper Craft


Hello everyone and welcome to the April 2021 Anthony's Paper Craft Group Design Team Project.  This month we are inspiring you guys with birthday cards since these are used all year long.  And, since April is Misty's birthday (April 29th, I believe) - we decided to also use purple in our projects since that is her favorite color. 

So, my card.  This was originally a Mother's Day idea.  And, to be honest, you can swap out the Happy Birthday sentiment for a Mother's Day sentiment.  Two ideas in one!     

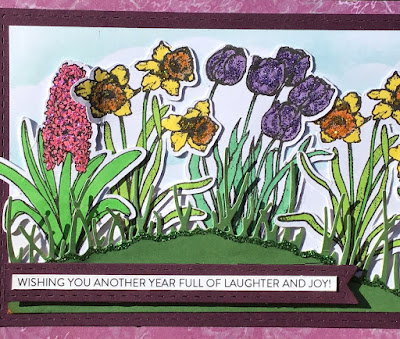
  • I started by stamping the hyacinth flowers from Flower Set 1 and the tulips and daffodil images from Flower Set 2, both from Anthony's Paper Craft, on to white cardstock and then I used my Scan N Cut to cut the images with a slight border.  Super easy peasy to do!


  • I made my slimline card base, 4" x 8.75", to fit in an envelope from here.  Then I printed one of the "purple" designs from the Prima Marketing Life In Colors Digital Paper Pack and adhered it to the card front.
  • Using the Slim Stitched Rectangle Die set from Pink Fresh Studio, I cut a piece of purple cardstock using the largest die and then a piece of white cardstock using the smaller die.  I also cut the Hill and Valley Grass Border die from Poppy Stamps using green cardstock and I cut a piece of white cardstock, 3.25" x 8.25".

  • I used my my homemade cloud stencil with Tumbled Glass Distress Ink and a blending brush on the piece of white cardstock.


  • Then I assembled my card.  Purple cardstock to card front, then grass to white cardstock with clouds, adhered to the purple cardstock.  I did not fully adhere the grass - only the bottom area to allow me to add the flowers. 


  • Now I colored in my flowers using a variety of Sharpie and BIC Intensity Ultra Fine Tip markers.   I also added some Orange, Milled Lavender, and Lavender Stickles to the flowers and set them aside to dry.

    Note:  In my final project I did not like the way Milled Lavender looked so I redid the flowers using a pink marker with Pink Glam Stickles and just glued it on top of the first flower.  Can't even tell! 
  • Once the flowers were dry I adhered them along the front of the card in the grass.  Then I added some green Stickles along the grass border. 

  • I also cut a banner die from the same purple cardstock, added a birthday sentiment sticker and adhered it with some pop dots.  (You can see the change of color in this photo, below).

Here's the final card with the change of color on the hyacinths.  


I hope you can take a moment to go check out the other birthday cards made by the other Design Team Members.  Links are below to all of their social media pages. 

Michael (World of Michael Trent)

IG:https://www.instagram.com/worldofmichaeltrent/
FB:https://www.facebook.com/worldofmichaeltrent
Blog:https://worldofmichaeltrent.blogspot.com/

Anthony's Paper Craft

Website: https://anthonyspapercraft.com/
IG: https://www.instagram.com/anthonyspapercraft/
FB: https://www.facebook.com/anthonyspapercraft

Chris (Christopher Crafts)

IG: https://www.instagram.com/christophercraftsindy/
FB: https://www.facebook.com/christophercraftsindy
Blog: https://sbcraftsbychristopherdale.wordpress.com/

Misty - The Jolly Fat Elf 

IG: https://www.instagram.com/thejollyfatelf/
FB: https://www.facebook.com/TheJollyFatElf

Pam Kline Stang


IG: https://www.instagram.com/plstang/
Blog: https://4mustangcreations.blogspot.com/

Thanks so much for stopping by the blog today!  I hope you loved this card as much as I do.  Let me know, leave a comment.  Until next time - 

Hugs from Brasil!

~Michael

Mother's Day Card with Anthony's Paper Craft and Impression Obsession


Hello everyone.  I hope everyone is doing well.  Today I have my card for the Anthony's Paper Craft April Design Team project.  We are focusing on Mother's Day cards and the idea for this card has been festering in my head for some time now.

I started by stamping the flowers from Flower Garden two times on white cardstock.  I then fussy cut one of the images in full and then fussy cut just parts of the flowers from the second image.


Then I colored the flowers using a variety of fine tip Sharpie markers.  I colored the whole bunch of flowers first and when I colored the single parts, I changed some of the colors.

Next I used some dies from Impression Obsession to cut all of my die cut pieces.  First I die cut the Wheelbarrow die with Mirri Silver Cardstock.  Then I went back and used Mirri Black Cardstock for the wheel and handles and Mirri Red Cardstock for the "barrow" part.

I also die cut the Fancy Cutout Border from white and kraft cardstock because I did not know which I wanted to use.  And the Small Grass Border die using green cardstock.


I put the wheelbarrow together by gluing the red and black pieces to the silver piece and trimming off any excess that needed to be trimmed.


Then I started to build my card front.  I adhered two of the kraft colored Fancy Borders to the right side of the card and trimmed off any excess.  Yes, I totally lifted this from Kittie Caracciolo.Then I adhered the grass to the bottom of the card trimming off any excess.
 

The last few things I did - I adhered the wheelbarrow and the flowers to the card front.  Then I adhered the smaller fussy cut flower pieces to the main image using pop dots.  Because Anthony doesn't have a Mother's Day sentiment (yet), I found a small one in my stash and I stamped it on the upper left hand corner.


Lastly, some Stickles (Ranger) to the flowers to give some more shimmer and shine.  
 

Done!  I hope you enjoyed this card.  I'd love to know what you think.  Have you started your Mother's Day cards yet?  

Until next time - Hugs from Brasil!

~Michael

Make A Tall Giraffe Slimline Card Using An A2 Giraffe Stamp | Technique Junkies | Giraffe Love

  Hello all. I am in love with the new Giraffe Love stamp from Technique Junkies .  It's one of the new stamps in the April 2024 New St...