Saturday, September 28, 2019

Give Thanks/Fall Card with Anthony's Paper Craft


Hello everyone!!  Is everyone enjoying the Fall season yet?  Here in the countryside of São Paulo, it's been overcast and chilly.  We went from 100 degrees last week to 60 this week.  And we are NOT in Fall but into Spring now.  

But, keeping in line with the chill in the air this week, today's card is an autumn-themed card using a beautiful set called Leaf/Fern Set from Anthony's Paper Craft.

I started by making a top folding A2 card from white cardstock.  I found a nice design from a digital paper pack called Honey Honey by Samantha Walker.  I printed it out and adhered it to the card front.


Using Coffee Archival Ink, I stamped one of the leaves on to another piece of white cardstock 1.5" x 5.25".  Then, using Tombow markers 946, 025, and 055, I blended the colors on the leaves.  


Next, I adhered this to a piece of brown cardstock and then to the card front.  From a sticker pack I had in my stash, I adhered the words "give" and "thanks".  


And, lastly, I applied Orange Peel Stickles to the leaves to give some shimmer and 3 small dots on the card front.  


So, I guess I actually made a Fall or Thanksgiving card - perfect for both themes.  I hope you liked this quick card.  I'd love to know...please leave a comment below!  

Until next time - 

Hugs from Brasil - 

Michael

Thursday, September 26, 2019

Anthony's Paper Craft - Mandala 4 Cards - One Stamp


Hello everyone.  Today I am joining my friend Debra (Meticulosity) for a joint blog post using some stamps from Anthony's Paper CraftDebra is using a new stamp set called Circle Flowers and I am also using Circle Flowers along with Mandala 5, which is the September Stamp of the Month (SOTM).

If you did not know, Anthony's Paper Craft has a Stamp Of The Month (SOTM) program.  Each month, if you add the SOTM to your cart, your whole order ships for FREE (USA only). 

I made 4 different cards using Mandala 5 and wanted to show you guys how you can get a lot of cards from using one stamp.  

My first card is a Golden 50th Anniversary card.  I adhered a piece of gold cardstock to my white card base.  Then I die cut a piece of black cardstock with a stitched rectangle die and embossed Mandala 5 on two of the corners with gold embossing powder.  I adhered this to the card front, put 50 using gold foam letters on a piece of black cardstock, which was layered on gold cardstock and adhered on the front.  Last was a few gold sequins.


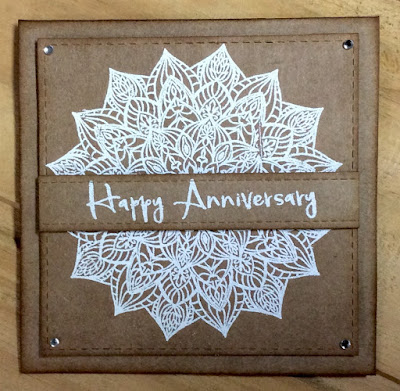
My next 3 cards are 4" note cards and I was able to get all 3 cards made with 1 sheet of 12" x 12" kraft cardstock.  I cut 3 pieces, 4" x 8", and scored them in half, for my card bases.  With the other 4" pieces, I die cut them using a stitched die. 

After distressing all the pieces with Vintage Photo Distress Ink (Ranger), I heat embossed Mandala 5 with some Fine Detail White Embossing Powder by Sweet Stamps (one of my fav).  I adhered a piece of fun foam to the back and then I adhered these to the card fronts.  Next, using the same white embossing powder, I heat embossed the sentiments - Happy Birthday, Happy Anniversary, and Congratulations - all from Circle Flowers, a brand new set.  I die cut the sentiments using a circle die and a banner die and then I adhered them to the card front. 


Well, that's just a few ideas for using this one Mandala stamp.  There are actually several mandala images that you can use in the same way.  Super simple with just embossing powder on kraft paper.  

Please remember to stop by Debra's blog post - HERE - and show her some love.  As always, I appreciate you stopping by and, until next time - 

Hugs from Brasil - 

~Michael 
For my next card, 

Saturday, September 21, 2019

A Very So-FISH-Ticated Card


Hello everyone.  I had to make a "fish/sea" card for my card swapping group and I thought I would take you along on my process.  I'm using supplies I have had in my stash for some time but most of them are still available to buy.  Cool!  

I started by making a top folding A2 card base.  Then I needed paper for the "water" look.  I found a paper pad in my stash called Sweet Nectar from K&Company which has papers with a textured look but without any actual texture to the paper.  This way, I can stamp and color without any problems.  I adhered the light blue to the card front.


Next, I die cut a piece of white cardstock with a 4" x 5.25" stitched rectangle die. Then I die cut it again using the Confetti Plate die by Spellbinders.  This will be my top layer.


Since I want to stamp in the circle sections, I placed it on top of my card front and lightly traced where I plan to stamp.


Next, using my Misti, I stamped images from "whale hello there" and "fish tales", both by Memory Box, into the various traced areas.  If I thought the image might go into another space, I used a piece of scrap xerox paper to mask off that area.  


Using the Misti allows me to stamp several images at the same time, several times, and to work in sections.


Next, I erased the pencil marks and colored in my fish using Ultra Fine BIC Markers.


I then stamped "i shore do miss you" on the stitched piece and then adhered it to my card front.  You could also use foam tape to have it raised up but, due to the postal costs, I decided to leave it flat.


Now, I could have just stopped here.  But I can't.  I added different colored Stickles (Ranger) to the fish and a few clear crystals.  Now, I am done!  


Thursday, September 19, 2019

If You Give A Crafter A Cookie - Back To School with Bugaboo Stamps


Hello everyone!  As I say every year, I cannot believe it's September....summer is over (for you guys in the USA)....and it's back to school for the kids.  Over on the If You Give A Crafter A Cookie Challenge Blog we are celebrating the "back to school" theme with Challenge No. 126 and here is the inspiration photo the design team had to work with - 


I started with a top folding A2 card base of white cardstock to which I adhered a piece of decorative paper from the Bundle of Joy A New Girl Collection from Echo Park.  I used one of the sheets called Alphabet Antics because of the letters on the sheet - perfect for a back to school theme.


Next up was my image.  Using Gimp (a free image editor), I merged two digital stamps into one - book stack and book sitter - both from Bugaboo Stamps.

After printing it to the size I needed, I die cut the image, along with a solid piece of cardstock, using dies from the A2 Matting Basics A and A2 Matting Basics B sets (Spellbinders).


Then I colored the image, adhered it to the solid cardstock, and then adhered this to the card front.  


Lastly, I printed out the words "back to school" on white cardstock, trimmed them, adhered them to cardstock, trimmed again, and adhered them to the card front. 


And here is the final card....ready to be placed into someone's lunchbox or book bag.  Or as a thank you note to a teacher.


I hope you guys like this card.  I'd love to know.  Feel free to leave a comment below!  And, if you join us during the next two weeks for this challenge, please let me know so I can check out your card.  

Thanks for stopping by the blog today and, until next time, hugs from Brasil!

~Michael

Thursday, September 5, 2019

If You Give A Crafter A Cookie 5 Year Birthday Celebration


Hello everyone!!!  Today is an awesome day - the If You Give A Crafter A Cookie Challenge Blog turns 5 years old!!!  Not many challenge blogs go for 5 years and I am proud to be on the design team, along with a lot of other talented people!  Some of the team members are having a giveaway so make sure you stop by all the blogs! 

If you wish to play along with the team for Cookie Challenge #125, which is a birthday theme, the inspiration photo for this challenge is - 


For my design team card, I went kinda simple.  But fun!  I started with a top folding A2 card base of white cardstock.  Using one of the dies from the A2 Matting Basics A Set (Spellbinders) I cut and embossed a piece of decorative paper, which I then adhered to the card front. 


Next, I cut a piece of white cardstock with a stitched rectangle die.  Then I stamped one of the cupcakes and the "happy birthday" sentiment from Cupcakes 1 (Anthony's Paper Craft).


Next, using BIC Ultra Fine Tip Markers and Studio 71 markers, I colored in the image.  


Next, I adhered this to a piece of white fun foam, which I then adhered to the card front.  And, lastly, I applied some Crystal and Yellow Stickles Glitter Glue (Ranger) to the cupcake frosting, the candle, and the bow.  


Here's the final card.  


Happy Birthday to the If You Give A Crafter A Cookie Challenge Blog!!  Here's hoping for several more fun years.  

I'd love to know what you think of my card - please feel free to leave me a comment below!!  I'll be back again soon with another fun project.  Until next time - 

Hugs from Brasil -
Michael 

Make A Tall Giraffe Slimline Card Using An A2 Giraffe Stamp | Technique Junkies | Giraffe Love

  Hello all. I am in love with the new Giraffe Love stamp from Technique Junkies .  It's one of the new stamps in the April 2024 New St...