Friday, September 25, 2020

Crafty Elves Countdown to Christmas - September 2020 Edition


Hello everyone!  Welcome to the August 2020 Edition of The Crafty Elves Countdown to Christmas.  Can you believe that Christmas is in 91 days!!  Crazy!  All I want for Christmas is a COVID-19 vaccine and world peace.  What do you want for Christmas/Hanukkah/Kwanzaa?  

Debra and Lisa, the other Crafty Elves, have also been busy making their September 2020 Christmas cards for you and I hope you will find some time to show them some love also!  Links directly to their September cards are at the end of this post. 

Now, on to my cards - 

Card Idea No. 1


I made this slimline card using Christmas Circles from Anthony's Paper Craft.  When I first saw the circle images in this set, I thought of the words HO, HO, HO and had to figure out a way to use this idea in a card, which I did!  
  • I made a  3.5" x 8.5" top-folding slimline card made with white cardstock to which I adhered a piece of red cardstock.
  • Next, I printed one of the papers from the Christmas Market Digital Mega Kit by Carta Bella on to a piece of white cardstock, cut it down to 2 7/8" x 7 7/8", which I adhered to a piece of black cardstock, 3" x 8", which I then adhered to the card front.   
  • Next, I stamped 3 of the circle images (the snowman, Santa, and the tree) on to white cardstock, colored them with BIC Intensity Markers, fussy cut them, and adhered them to the card front.
  • Next, using the die of the letter "H" from the Outline Letters Alphabet Set from Creek Bank Creations, I cut 2 of the letter using red fun foam and 1 letter using red cardstock - for each of the images.  You will have 6 of fun foam and 3 of red cardstock.
  • Adhered two of the fun foam letter H together and then adhered a red cardstock letter H to the top.  Then adhere next to each image.  
  • I stamped the 3 images again on to white cardstock, colored in each image again, fussy cut them and adhered to the first image using fun tape or pop dots.
  • Lastly, I applied Glossy Accents to the top of each letter "H" and allowed them to dry.  I also adhered a few red crystals I had in my stash.
Card Idea No. 2


This image popped up in my Pinterest feed and when I clicked on THIS link, it was for free digital coloring pages.  I am hoping it was a real /legal site and I ended up saving this image of Woodstock on top of the lamppost.  I knew this would be a fun and fast Christmas card.  
  • I started with a 4" x 9" top-folding slimline card made with white cardstock.  
  • Then I adhered a sheet of decorative paper.  The paper is a from the Christmas Past Collection by Graphic 45.  
  • I printed my image on white cardstock and colored it with some BIC Intensity Markers.
  • I mounted this on a piece of red cardstock, which I then adhered to the card front.
  • Lastly, I applied Glossy Accents to the lamppost glass and, when dry, I applied Frosted Lace Stickles for the snow.
Card Idea No. 3


This was one of my favorite cards to make this month.  It's been in my head for weeks and it felt great to finally get it out!  This whole card uses stamps and dies from Your Next Stamp.  
  • I made a  4" x 9" top-folding slimline card made with white cardstock to which I adhered a piece of red cardstock.
  • Next, I cut a piece of white cardstock, 3.75" x 8.75" and used a cloud stencil with Faded Jeans Distress ink to make the cloud background.  
  • I stamped the images from the Santa Express and Santa Express Train Carts sets,  and then I die cut them using the matching Santa Express Die Set and Santa Express Train Carts Die Set.  
  • I colored in all the images using BIC Intensity Markers.  
  • I cut the All Aboard Train Track Die several times and adhered them across the bottom of the card front.
  • I stamped the sentiments using black ink and then I adhered the train engine and carts using pop dots across the card front on the train tracks.
  • Lastly, I adhered Frosted Lace Stickles in some areas, Glossy Accents on the ornaments to make them look like glass, and crystals on the tree and in the center of each of the peppermint wheels.
Card Idea No. 4


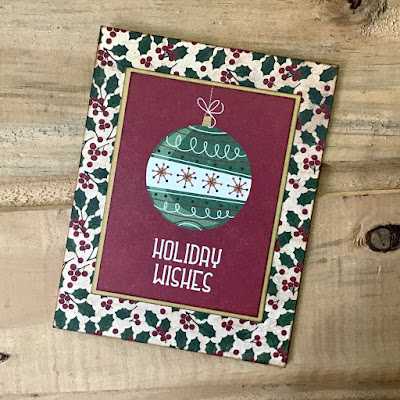
Not everyone has stamps and dies laying around. Or, maybe you are a papercrafter or scrapbooker and have more papers than stamps or dies.  Then this idea is perfect for you and for anyone who wants to make some cards quickly and without breaking the bank.  

The 4 cards below were all made using papers from the Christmas Memories line by Photo Play Paper.  
  • I started by making 4 top-folding A2 card bases of white cardstock to which I adhered a piece of decorative paper to the front of each one.    
  • One of the sheets, Joyful Season (CMR9485), has 1 side with journaling cards that measure 3" x 4".   I carefully trimmed 4 of the sayings I wanted to use on my card front and layered each of them on a piece of red or gold cardstock that measures 3.25" x 4.25".
  • Then I adhered these to the front of each of the cards.  
Honestly, it does not get any easier than this!  Below are the 4 cards.  


Done!!

I'd love to know which card(s) is/are your favorite and I really hope these cards have inspired you to dig into your stamp stash and to find the time to make some holiday cards yourself.

Please remember to check out what the other Crafty Elves have up their sleeves this month - 


As always, thanks so much for stopping by my blog today!  If you like what you see on my blog, you can also follow me on my Instagram page, which has photos of life here in Brasil, as well as food and adorable pet photos.  Just click HERE!

Until next time, hugs from Brasil - 

~Michael

Thursday, September 17, 2020

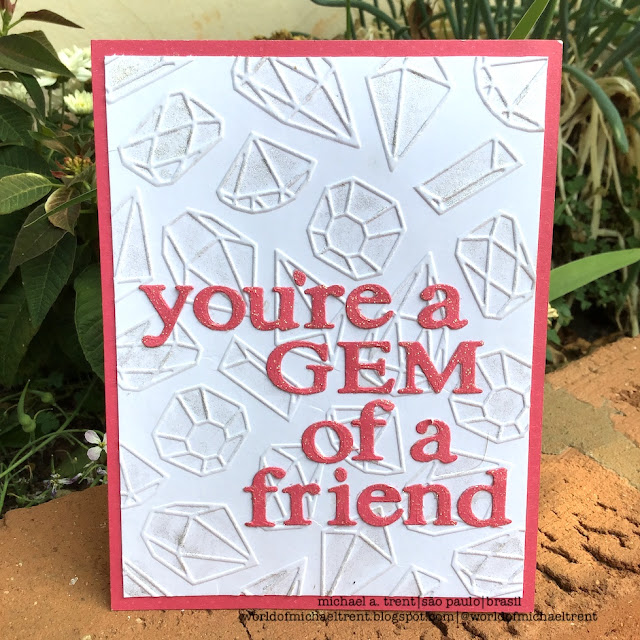
You're A Gem of a Friend


Hello y'all.  I hope everyone is okay and trying to stay as safe as possible.  2020 has certainly been a trying year for all of us.  We are moving out of winter into spring but considering how hot it is here I think we jumped right to summer.  But I do love the heat! 

It's that time - a new challenge over on the If You Give A Crafter a Cookie Challenge Blog.  We are up to Challenge No. 151 and it's all about gems...diamonds...shiny rocks...or, maybe, a rainbow! Here is the inspiration photo the Design Team had to work with should you wish to join us!


Although I used some older items from my stash to make this card, there are plenty of newer items on the market that can be used in their places if you want to recreate the card.  

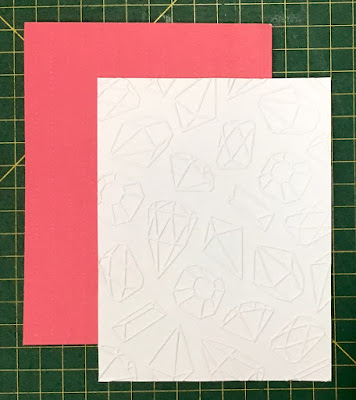
I started by making a top-folding A2 card base using white cardstock.  Then I covered it with a piece of decorative scrapbook paper.  I also cut another piece of white cardstock, 4" x 5.25", and embossed it using the Gems Background Embossing Folder by Darice.   


Next, I used a piece of glittered paper and the Sizzix Sizzlits Decorative Strip - Naturally Serif, to cut out the letters for my sentiment - "you're a GEM of a friend". Although it's discontinued, there are plenty of alphabet dies out there that can be used.  


Next, I adhered the Gems Background to my card front.  Then I adhered each of the letters to the card front to form my sentiment.  You can use liquid glue if you want but I used my Xyron 1.5" Sticker Maker.   


The last thing I did was to apply Clear Wink of Stella in all the gems to give shimmer to the card front and the gems.  


I hope you enjoyed this card idea.  If you want to play along with us, just click HERE to be taken to the challenge blog. If you play along with the challenge, please let me know so I can check out your creation.  

Thanks for stopping by the blog today.  Stay safe and, until next time - 

Hugs from Brasil - 

~Michael

Friday, September 4, 2020

Happy Birthday Cupcake!


Hi everyone!!  I hope y'all are doing okay.  We have a long weekend coming up also (Monday is Brasil's Independence Day) and we are planning a day trip to an Olive tree farm where they make their own olive oil. I hope.  We are hearing that some towns are closing their borders so, we'll see.  

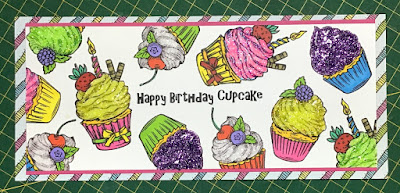
Today's card was made using Cupcakes 1 from Anthony's Paper Craft and I think it's perfect, not just for someone that loves cupcakes, but also for a birthday. 

On a side note, before we get to the step by step - Misty, The Jolly Fat Elf, did a great video (and has one or two more coming) showing what she did with the set too.  Check it out HERE!
   
Now...for my card.

I started by making a card base out of white cardstock, 4" x 9", which I covered with decorative paper from my stash.

Then I cut another piece of white cardstock, 3.5" x 8.5", which I put into my Misti, and, using a center ruler, I stamped the sentiment in the center.  


Then I stamped the various cupcakes going in different directions so they surrounded the sentiment.   


Next, I colored in all the cupcakes using Prismacolor and Letraset markers and then I layered it on a piece of pink cardstock, 3 5/8" x 8 5/8".


Lastly, working slowly, I adhered various colors of Stickles as the frosting on the cupcakes and set it aside to completely dry.  I used Yellow, Firefly, Lavender, Glam Pink, and Frosted Lace Stickles. 


Here is the final card after everything dried.


And here is another card I made but this time I used Clear Wink of Stella on the cupcake frosting and I stamped my sentiment separately and added to the lower corner.


Done!  I'd love to know what you think.  Feel free to leave me a comment below.  I have another card or two using the Cupcakes 1 set so keep a look out for them in the next few days.  

Have a safe weekend everyone.  And, until next time - 

Hugs from Brasil - 

~Michael


Thursday, September 3, 2020

Slimline Back To School Card


Hello Hello Hello everyone!!  It's time for a new challenge over on the If You Give A Crafter A Cookie Challenge Blog.  If you would like to play along with us for Challenge No. 150, here is the "inspiration photo" that the team had to work with - 


I am also going to enter this card into a few "anything goes" card challenge blogs if you want to play along with them too.


As soon as I saw the photo that the Design Team had to work with, I got the idea in my head to make a slimline card with books stacked up high and a girl sitting at the top, reading. 

Let's first make a top-folding slimline card - 

  • I cut two pieces of white cardstock, 3.5" x 8.5" and 3.5" x 9".  
  • I placed the 2nd piece with the 9" side along the top of my scoreboard and scored at 1/2".    
  • Then I burnished the 1/2" section, applied double-sided tape to it, and adhered it to piece 1 to form the card.   
  
Now that the top-folding slimline card is done, I then adhered a piece of red cardstock to the front.  

Now for the papers -  

I used the digital version of Echo Park's Back to School Mega Collection and I printed a full A4 page of one design (the one with the script on the blackboard) and the other page with the small journaling cards. 

Now for the digi stamps - 

Using a graphics program (Pages), I imported the 2 digital stamps I wanted to use on the card front - Book Stack and Girl Book Sitter both by Bugaboo Stamps.  (If you want to recreate this card but with a boy, they also have a Boy Book Sitter image).  Then I printed several of the book image and two of the girl image on to white cardstock (I plan on making more than one card).  

This is what you should have now - 


Next, I cut a piece of "script on the blackboard" paper to 3.25" x 8.25" and adhered it to the card front.  I also fussy cut the image on the small journaling card that says "what we learn becomes who we are" and put it to the side to use later.

Then, I colored 4 of the book stacks and one of the girl reading.  Then I fussy cut the images.  

This is what you should have now - 


Now to put the card together -

Before adhering the books down, I do a test to see how they will stack.  You will need to cut some off or cut them apart to your liking.  Just remember to leave room for the girl at the top. 

When I have it they way I want, I adhere the books using foam tape and then the girl at the top sitting on the book stack.  You will need to put some glue on her legs, not foam tape, as they will adhere to the books.


Lastly, I adhered the quote we cut out earlier, using foam tape and wet glue, and I put some Glossy Accents on the glasses so they look like glass when dry.  


Here is the final card.  


I have a friend who is a teacher here and I think this will be a perfect gift for her for her house or classroom.  I'd love to know what you think of the card.  And, if you play along with the challenge, please let me know so I can check out your creation.  

Thanks for stopping by the blog today.  Stay safe and, until next time - 

Hugs from Brasil - 

~Michael

Make A Tall Giraffe Slimline Card Using An A2 Giraffe Stamp | Technique Junkies | Giraffe Love

  Hello all. I am in love with the new Giraffe Love stamp from Technique Junkies .  It's one of the new stamps in the April 2024 New St...