Posts

Showing posts with the label Technique Junkies

Crafty Elves Countdown to Christmas with Deb and Lisa | February 2025 Edition | Simon Says Stamp

Image
  Hello everyone and welcome to the February 2025 Edition of the Crafty Elves Countdown to Christmas with Deb and Lisa .  If you are new here, on the 25th of each month, we post one or more holiday cards.  This way, come November, we don't have to stress over making cards to send to people.  We hope to inspire you and hope you will join us.           This month's card is an easy-peasy slimline Christmas card.  To make the card you will need red cardstock, Christmas paper, a piece of fun foam, 2 dies from Simon Says Stamp, and two sentiment stamps from Technique Junkies.    I made a top-folding slimline card base, 3 5/8" x 8 5/8", using red cardstock.   Then I cut a piece of Christmas paper from my stash, 3 1/4" x 1/4".  I adhered a piece of fun toam to the back, and then to the card front.    Using red and green cardstock, I die cut the words "Merry" and "Christmas" - using the CZ Design Chun...

2025 Cards 6 and 7 | Love You a Latte Valentine's Day Card | Technique Junkies | Graciellie Designs

Image
  Hello, everyone. Today, I am sharing these 2 cards for Valentine's Day, which is fast approaching, but you can certainly use them for any special day. especially if you are a coffee lover or have a coffee lover in your life.   If you want to make these or something like them, below is a list of what I used with links, where available.   Red Cardstock White Cardstock Stitched Rectangle Die Set - Gina Marie Designs   Stitched Square Die Set - Gina Marie Designs Coffee Lovers Digital Paper Pack  -  Graciellie Designs Falling Checks rubber stamp - Technique Junkies Love You A Latte rubber stamp - Technique Junkies Red Velvet Ink Cube - Gina K. Designs Onyx Black Versafine Ink Clear Embossing Powder Fun Foam  To make the card: I made a top-folding A2 card using red cardstock. Using a 4" x 5.25" stitched rectangle die, I die-cut a piece of white cardstock and adhered it to the inside of the card.  If you don't have this die,  you ca...

Draped Ornaments Slimline Christmas Card | Technique Junkies | BIG SALE!

Image
  Hello everyone.  I hope y'all are doing well this holiday season.  I've been busy giving some album classes to photography clubs and making special order albums for some people in town.  Today I just had to make a card for a change of pace.  The stamps I used are on sale and that info is at the end of today's post.  Today's card is a slimline Christmas card using 2 stamps from Technique Junkies - Draped Ornaments  and Dotted Merry Christmas .  I also used 2 dies from the Essentials: Slim Stitched Rectangle Die Set from Pink Fresh Studio .   I made a 3 5/8" x 8.25" slimline card base by cutting a piece of white cardstock, 7.25" x 8 5/8"", then scoring on the short side at 3 5/8".  Folded it in half, burnished well, and I had my base.   Using the largest of the slimline dies from the Pink Fresh Studio Slim Stitched Rectangle Die set, I die-cut a piece of red cardstock and adhered it to my card front.   If you do...

Technique Junkies | October New Stamp Release | Newborn King Christmas Card

Image
  Hello everyone and welcome to the  October 2024 New Stamp Release  with  Technique Junkies .  This month there are 10 new stamp sets to whet your appetite - ALL for Christmas and the holidays.     All the new stamps in the release are 15% off through Sunday, October 8th and, if you use my code - TJ10Michael - you can take 10% off everything else on the website. If you love and want ALL the new stamps, grab the  Gotta Have It All Bundle , for only $65.63 - a savings of $21.87 (25% off) of the retail price - $87.50.  It's a great deal and it's like getting a few stamps for free. To help celebrate the new release, I made a Christmas card using Newborn King - Set of 2  and one of the sentiments from Cozy Christmas - Set of 7 .     I don't normally make a religious type of card but I loved the simplicity of the image in Newborn King and wanted to use it without any color.    If you want to recreate this ca...

Day 26 of 30 Days of Halloween/Autumn Cards | Halloween Digi Stamp | Littles Printables

Image
  Hello everyone and welcome to  Day 26 of my 30 Days of Halloween/Autumn Cards. Today I have a Halloween card using a Halloween digi stamp I purchased from LittlesPrintables on Etsy.   I bought this image last year and it looks like it's no longer available to buy.  But, checkout their store because they have many other images you can use to make a card.       If you want to make this card or one like it, here is what I did: I made a top-folding A2 card base using orange cardstock.   I die-cut a piece of black cardstock using a 4" x 5.25" stitched rectangle die, which I adhered to the card front. I die-cut a piece of white cardstock using a 4" x 5.25" stitched rectangle die, stamped  Wicked Halloween  from Technique Junkies, and adhered it to the inside. I printed the Halloween image from Littles Printables - twice - on white cardstock and die-cut it using a die in my stash.   I colored one image in full using alcoho...

Day 25 of 30 Days of Halloween/Autumn Cards | Googly Eyes| Scrabble Tiles| Technique Junkies

Image
  Hello everyone and welcome to  Day 25 of my 30 Days of Halloween/Autumn Cards.  Today I have another Halloween card using another "non-Halloween stamp" - Stencil Rings from Technique Junkies - to turn it into one.      If you want to make this card or one like it, here is what I did.  This is NOT a 5-minute card.  LOL   I made a top-folding A2 card base using orange cardstock.   I die-cut a piece of white cardstock using a 4" x 5.25" stitched rectangle die, stamped Wicked Halloween in one corner, and adhered it to the inside. I stamped Stencil Rings on white cardstock, die-cut it using a 3.75" x 5" stitched rectangle die, layered it on a piece of black, and then the card front.   I adhered 3 Scrabble tiles - B-O-O to a piece of black cardstock and then to the card front.    Lastly, I glued a googly eye in the center of each of the stencil rings.        Day 18 done!  I...

Day 24 of 30 Days of Halloween/Autumn Cards | Halloween Background | Technique Junkies

Image
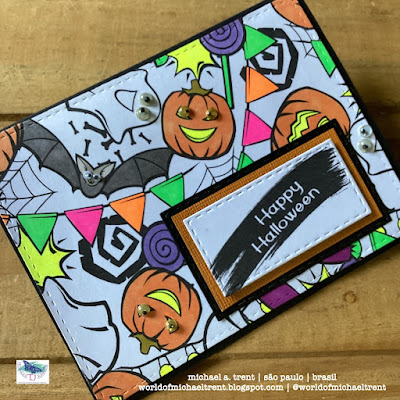
Hello everyone and welcome to Day 24 of my 30 Days of Halloween/Autumn Cards.  Today I have a  Halloween card I made using 3 stamps from Technique Junkies - Halloween Background  and  Halloween Paintstroke  on the front of the card, and Wicked Halloween as my sentiment on the inside of the card.   Other than the time to color some of the images, it's a fast card to put together.     If you want to make this card or one like it, here is what I did: I made a top-folding A2 card base using black cardstock.     I die-cut a piece of white cardstock using a 4" x 5.25" stitched rectangle die, stamped Wicked Halloween on it, and adhered it to the inside. I stamped Halloween Background on white cardstock, die-cut it using a 4" x 5.25" stitched rectangle die, colored some of the images using alcohol markers, layered it on a piece of black fun foam, and then to the card front.    I stamped Halloween Paintstroke on white ...

Day 23 of 30 Days of Halloween/Autumn Cards | Take Time to Watch the Leaves Turn | Technique Junkies

Image
Hello everyone and welcome to Day 23 of my 30 Days of Halloween/Autumn Cards.  Today I have 2 cards for autumn using a sheet of beautiful fall paper from a Brasilian company.  One card has 2 layers, the other has 3, and both share the same beautiful paper and the Leaves Turn sentiment from Technique Junkies.   If you want to make one of these cards, or one like it, here is what I did: I made two top-folding A2 card bases from 2 different tones of orange.   I then die-cut 2 pieces of white cardstock,  die cut them each using a 4" x 5.25" stitched rectangle die, and adhered 1 to the inside of each card - where a message can be written. I stamped Leaves Turn - twice - on white cardstock, die cut using a banner die, layered them on a piece of orange cardstock, and set to the side to use later.  Card No. 1 I die-cut a piece of the fall leaves paper using a 4" x 5.25" stitched rectangle die, adhered it to a piece of fun foam, and then to the card front....

Day 21 of 30 Days of Halloween/Autumn Cards | Fluff Your Tutu for Halloween | Wicked | Technique Junkies

Image
  Hello everyone and welcome to  Day 21 of my 30 Days of Halloween/Autumn Cards.  Today I have another Halloween card that I made using 2 stamps from Technique Junkies  - just the tutu from  Fluff Your Tutu for the front of my card and  Wicked Halloween  for the inside.   Now, Fluff Your Tutu is not a Halloween stamp but I turned it into one.  The image of the tuto reminded me of the Wicked movie being released this year and by using just the image, I could make a Halloween card.  Here's how I did it -   I made a top-folding A2 card base using black cardstock. I used my 4" x 5.25" stitched rectangle die to cut a piece of purple Halloween paper, which I adhered to the card front. I used my 3.25" x 4.5" stitched rectangle die to cut a piece of orange cardstock, embossed it with an embossing folder, layered it on a piece of black cardstock, and then to the card front.  For my main image, I needed the tuto image from Fl...

Day 20 of 30 Days of Halloween/Autumn Cards | Using Danse Macabre Digi Halloween Paper on Cards

Image
  Hello everyone and welcome to  Day 20 of my 30 Days of Halloween/Autumn Cards. Today I have 4 Halloween cards I made using the 2 sentiments from   Shake, Set of 2 from Technique Junkies  and some dancing skeletons from the  Danse Macabre papers from Raven Printable Design on Esty. If you want to make these cards or one like it, here is what I did.   I made 4 top-folding A2 card base using black cardstock. I die-cut 4 pieces of white cardstock using a 4" x 5.25" stitched rectangle die and I stamped different Halloween sentiments on each one.  I used 3 from Technique Junkies  - Wicked Halloween ,  Spidery Halloween , and  No Skeletons .     I printed 4 of the papers, die-cut each of them using the same 4" x 5.25" stitched rectangle die, adhered them to a piece of black fun foam, and then to the card front.   I stamped the sentiments from Shake, Set of 2 on white cardstock, die-cut them using banner dies, ...