Happy Birthday To Misty with Anthony's Paper Craft
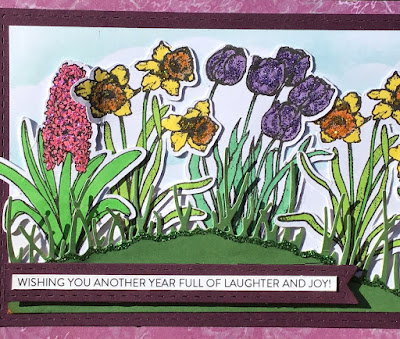
So, my card. This was originally a Mother's Day idea. And, to be honest, you can swap out the Happy Birthday sentiment for a Mother's Day sentiment. Two ideas in one!
- I started by stamping the hyacinth flowers from Flower Set 1 and the tulips and daffodil images from Flower Set 2, both from Anthony's Paper Craft, on to white cardstock and then I used my Scan N Cut to cut the images with a slight border. Super easy peasy to do!
- I made my slimline card base, 4" x 8.75", to fit in an envelope from here. Then I printed one of the "purple" designs from the Prima Marketing Life In Colors Digital Paper Pack and adhered it to the card front.
- Using the Slim Stitched Rectangle Die set from Pink Fresh Studio, I cut a piece of purple cardstock using the largest die and then a piece of white cardstock using the smaller die. I also cut the Hill and Valley Grass Border die from Poppy Stamps using green cardstock and I cut a piece of white cardstock, 3.25" x 8.25".
- I used my my homemade cloud stencil with Tumbled Glass Distress Ink and a blending brush on the piece of white cardstock.
- Then I assembled my card. Purple cardstock to card front, then grass to white cardstock with clouds, adhered to the purple cardstock. I did not fully adhere the grass - only the bottom area to allow me to add the flowers.
- Now I colored in my flowers using a variety of Sharpie and BIC Intensity Ultra Fine Tip markers. I also added some Orange, Milled Lavender, and Lavender Stickles to the flowers and set them aside to dry.
Note: In my final project I did not like the way Milled Lavender looked so I redid the flowers using a pink marker with Pink Glam Stickles and just glued it on top of the first flower. Can't even tell!
- Once the flowers were dry I adhered them along the front of the card in the grass. Then I added some green Stickles along the grass border.
- I also cut a banner die from the same purple cardstock, added a birthday sentiment sticker and adhered it with some pop dots. (You can see the change of color in this photo, below).
Here's the final card with the change of color on the hyacinths.
I hope you can take a moment to go check out the other birthday cards made by the other Design Team Members. Links are below to all of their social media pages.
Michael (World of Michael Trent)
IG:https://www.instagram.com/worldofmichaeltrent/
FB:https://www.facebook.com/worldofmichaeltrent
Blog:https://worldofmichaeltrent.blogspot.com/
Anthony's Paper Craft
Website: https://anthonyspapercraft.com/
IG: https://www.instagram.com/anthonyspapercraft/
FB: https://www.facebook.com/anthonyspapercraft
Chris (Christopher Crafts)
IG: https://www.instagram.com/christophercraftsindy/
FB: https://www.facebook.com/christophercraftsindy
Blog: https://sbcraftsbychristopherdale.wordpress.com/
Misty - The Jolly Fat Elf
IG: https://www.instagram.com/thejollyfatelf/
FB: https://www.facebook.com/TheJollyFatElf
Pam Kline Stang
IG: https://www.instagram.com/plstang/
Blog: https://4mustangcreations.blogspot.com/
Thanks so much for stopping by the blog today! I hope you loved this card as much as I do. Let me know, leave a comment. Until next time -
Hugs from Brasil!
~Michael


.jpeg)
.jpeg)
Such a darling and festive slimline birthday card to honor Misty! I love your colors and dimension.
ReplyDeleteMichael, love this card. Perfect spring time Birthday Card. Also wonderful job on your process on making it. 👏
ReplyDelete