Making Four Valentine's Day Cards Using A "Littles Printables" Coloring Page
Do you need or want to make some Valentine's Day cards but are short on time? Or don't have the stamps or dies? Maybe you want to include your son, daughter, or grandchild in the cardmaking process? Or, maybe, you just want to do something different? Why not try a coloring page?
I made 4 Valentine's Day cards using the I Spy Valentines Coloring Page from Littles Printables, one of my new favorite stores on Etsy. On the day I post this blog, this is on sale for $1.12. How can you beat that? When I saw this page I immediately saw a slimline card using the bottom of the page and at least 3 more cards using the top portion.
**Note: I am not affiliated with Little Printables.
The hardest part of this process is coloring the page. So, warning, if you do not love to color or do not have the patience to color, this post is not for you. LOL. But, if you love to color as much as I do, keep reading. I used Ultra Fine Tip Intensity Markers from BIC, which are really my favorite markers to use, especially in small spaces.
Card No. 1
- I started with a top-folding A2 card using white cardstock and adhered the part of the colored coloring page to the right side of my card front.
- I die-cut a piece of white cardstock using a 4.25" x 5.5" stitched rectangle die.
- I stamped Little Love You (Technique Junkies) in the center but more to the left and die-cut it again using one of the scalloped dies from A2 Scalloped Borders One (Spellbinders).
- I also cut a piece of white fun foam to adhere under it.
- I adhered the fun foam to the back of the white cardstock with the Love You stamped on it, and then I adhered it to the card front.
- Lastly, I added a few red enamel dots to the card front.
For this card, I used the bottom part of the coloring page and the Sweet Scalloped Slimline Dies (Heffy Doodle) to make a slimline card.
- I started by adhering some Valentine's Day paper to the front of my 3.25" x 8.25" slimline card base. Cut a piece of white cardstock 8.25" x 6.5" and score the short side at 3.25".
- Next, using the middle scallop die, I cut a piece of red cardstock. Using the smallest scallop die, I cut a piece of red glittered fun foam. Using the heart die, I also cut a piece of red glittered fun foam.
- I adhered the red cardstock to the card front, then the red glittered fun foam, then the section of the coloring page, and the heart on the bottom right side.
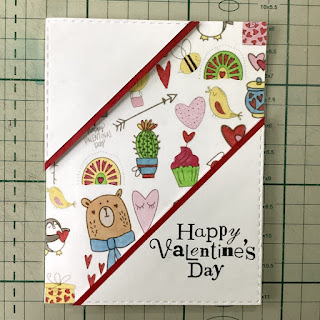
- I adhered part of the coloring page to the front of a top-folding A2 card.
- Using a 4.25" x 5.5" stitched rectangle die, I cut a die-cut a piece of white cardstock, and then I used a ruler and craft knife to cut my corners, as follows:From the upper left corner, make a tic mark 2.75" (7cm) to the right.From the upper left corner, make a tic mark 2.75" (7cm) down the left side.From the upper right corner, make a tic mark 2" (5 cm) down the right side.From the lower right corner, make a tic mark .75" (2cm) to the right.Then use a ruler and craft knife to cut from tic mark to tic mark.
- Using the triangle piece for the upper left corner, I adhered a strip of red cardstock along the long edge, trimmed the other 2 sides, adhered a piece of fun foam to the back (you can use foam tape/squares too ), and adhered it to the upper left corner of the card front.
- For the triangle piece for the lower right corner, I stamped my sentiment, adhered a strip of red cardstock along the edge, trimmed it, and adhered it to the card front using fun foam.
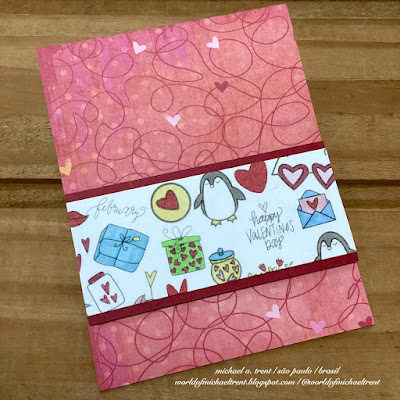
- I adhered a piece of Valentine's Day paper to my A2 card front.
- I trimmed the last scrap of the coloring page to 4.25" x 1.75" and adhered it to a piece of red cardstock.
- I adhered a piece of fun foam to the back and then to the card front.


.jpeg)
.jpeg)
Comments
Post a Comment