Sunday, September 24, 2023

Crafty Elves Countdown to Christmas September 2023 | Technique Junkies | Christmas Card


Hello everyone, and welcome to the September 2023 Edition of The Crafty Elves' Countdown to Christmas.  If this is your first time here, on the 25th of each month, I am part of a Christmas collab with some of my Crafty Elf friends - Debra of Meticulosity and Lisa of Life of a BZScrapper - and we each post a fun Christmas or Holiday card to help inspire you to make your own.  

This month we have a Guest Crafty Elf - Pam Kline Stang of Mustang Creations. Links to the other Elves' cards, and to our social media pages, are at the end of this post.   


This month I made a Christmas card using 2 stamps - Christmas Frame and the Gifts of Christmas Set - both from Technique Junkies.

  • I made a top-folding A2 card base using red cardstock.  Then I stamped the Christmas Frame stamp on white cardstock, die-cut it using a 4.25" x 5.5" stitched rectangle die, and adhered it to the card front.  
  • Next, I colored in the image using a variety of BIC Intensity Ultra Fine Tip Markers.
  • For the center, I cut a piece of red and gold cardstock, used a decorative punch on the corners, and adhered them to the center.  
  • I cut a piece of white cardstock and stamped one of the sentiments from the Gifts of Christmas Set.  I used the same decorative punch on the corners and adhered this to the gold cardstock.  
  • For the inside, I die-cut a piece of white cardstock, die-cut it with a 4" x 5.25" stitched rectangle die, stamped another of the sentiments from the Gifts of Christmas Set, and adhered it to the inside of the card.  
  • Lastly, I added some stickles to the card front to add some shimmer.  

I hope you have enjoyed this card and I really hope you will find time to visit the other Crafty Elves and see what they made.  Their links are all below.  

Michael - World of Michael Trent

Debra - Meticulosity
Blog (today's card)

Lisa - Life of a BZ Scrapper
Blog (today's card)

Pam - Mustang Creations
Blog (today's card)

Thanks so much for stopping by my blog today.  I would love to know what you think of this card idea - leave a comment below and, until next time - 

Hugs from Brasil.

~Michael

Friday, September 15, 2023

Rosh Hashanah/Shana Tova/Jewish New Year Card Ideas and a Brief Explanation of the Holiday


Hello everyone and welcome to the first night of Rosh Hashana, or Shana Tova, or Shanah Tovah, which are all the ways Jewish people say Happy New Year.  Even though I am Jewish, I don't think I ever made any cards for this holiday and I have no stamps or dies that I could really use.  But a friend of mine told me she was going to mail me one and that lit a fire under my bum to make one for her too - and a few extra.  

Before I get to my card...what is Rosh Hashanah?  Short answer...

Rosh Hashanah is the birthday of the universe, the day G-d created Adam and Eve, and it's celebrated as the head of the Jewish year.  It begins at sundown on the eve of Tishrei 1 (Sept. 15, 2023) and ends after nightfall on Tishrei 2 (Sept. 17, 2023).  The holiday also includes round challah bread with raisins (gosh I miss challah bread) and apples dipped in honey that symbolize the wishes for a sweet year.

To learn more about Rosh Hashanah check out chabad.org, which is where I got the above info. 

Now...on to my card ideas...

Not having any stamps or dies for this holiday, I needed ideas.  
So I jumped on Pinterest - of course.  
And I found this idea, below.  If you love the idea that inspired my card, you can actually buy it by clicking HERE.  (not from me but sharing the link cuz it's the right thing to do).  


Since I don't have any dies that look like the above card, I decided to use embossing folders, of which I have plenty.  None have apples, nor do I have any apple dies or stamps, so I used red cardstock to represent the idea of apples and a sweet New Year. 

  • I started with a 5.5" square card base using red cardstock. 
  • Then I embossed a piece of 5.25" square white cardstock using the Illusion Triangles 3D Embossing Folder from Altenew and adhered it to the card front.  I don't know if Altenew made it this way or not but it is an embossing folder of the Star of David - perfect for all Jewish holidays.  

Now for the sentiment on the front of the cards.  
Since I don't have any stamps or dies, I just typed up and printed my own sentiments, die-cut them and a piece of red cardstock using stitched square dies, and then adhered them to the card fronts.  
Easy peasy!


To finish off these cards, I added a few red enamel dots to the card fronts and, for the inside, I stamped Happy New Year from Technique Junkies on a piece of white cardstock and adhered them to the inside of the cards.


I'm working on a few more ideas and will have them here this weekend.  If you are Jewish or celebrate with Jewish friends, Happy New Year, Shana Tova, Happy Rosh Hashana and I hope you all have a very sweet year.  

Until next time...

Hugs from Brasil.

~Michael


Wednesday, September 13, 2023

He Made It/She Made It | Explore The World | Technique Junkies


Hello everyone and welcome to a new He Made It/She Made It collaboration with my friend Debra of Meticulosity.  Each month we decide on which stamp to use and then we each make a card using that stamp to see what we each come up with.  

This month we chose the new Explore The World stamp from Technique Junkies.


Debra and I love to read and it really is the best way to explore the world if you cannot travel.  You can also explore the world from the comfort of your own home by watching videos and documentaries on YouTube or Netflix.  But I think the best way to explore the world is by eating or making dishes from other countries or nationalities, which is something I love to do.  So I took a photo of some of my cookbooks to use as the main focal point of my card.    

  • I made a 5.75" square card base using black cardstock.
  • I cut a piece of white cardstock, 5.5" x 5.5", embossed it with the Cross Weaves 3D Embossing Folder from Altenew, and adhered it to the card front. 
  • I took a photo of some of the cookbooks in my stash, printed it, trimmed it to 4.75" square, adhered it to a piece of black cardstock, and then to the card front.  
  • Lastly, I stamped and embossed Explore the World, adhered it to a piece of black cardstock, and then to the card front.  I also adhered a piece of white cardstock to the inside for my message. 

Now it's time to head over to Debra's blog and check out what she made.  You can also find her on Facebook and Instagram.  You can also find me on Facebook and Instagram too.      

If you loved the Explore the World stamp I used today, which is from Technique Junkies, you can save 10% at checkout by using my code - TJ10Michael - I might earn a small commission from your purchase, and I thank you in advance of using it.    
Until next time...

Hugs from Brasil.

~Michael

Saturday, September 9, 2023

DAy 9 Halloween/Autumn Cards 2023 | Blessings | Worn Leaves | Technique Junkies


Hello everyone and welcome to Day 9 of my 31 Days {hopefully} Halloween/Autumn Cards 2023 series.  Today I have another simple and beautiful (I think) gratitude/blessings/Thanksgiving card using Worn Leaves Background and Autumn Framed Sentiments, both from Technique Junkies, with the Ombré Autumn ink from Hero Arts.   

  • I started with an A2 card base from white cardstock.
  • I adhered a piece of autumn orange cardstock to the card front.
  • I die-cut a piece of white cardstock using a stitched rectangle die and then I stamped Worn Leaves on the front using the Ombré Autumn ink pad from Hero Arts.  I LOVE this ink pad.  :-)
  • For my sentiment - I used the same cardstock as my card front, stamped my sentiment using Onyx Black Versafine Ink, heat embossed it with clear embossing powder, trimmed it, layered it on a piece of black cardstock, and then adhered it to the card front.  
Done.  If you wanted, you could add a few crystals or enamel dots but I kept the card simple with that big bold sentiment doing all the work for me.  I hope this card shows you how simple and fast it can be to make a beautiful card.  

Both of these images are available on the Technique Junkies website and, if you would like to save 10%, you can use my Friends & Family Discount Code at checkout - TJ10Michael.  I might earn a small commission.

Enjoy the rest of your Saturday.  I'll be back tomorrow with another card - hopefully.  LOL

Hugs from Brasil.

~Michael

Supplies Used:

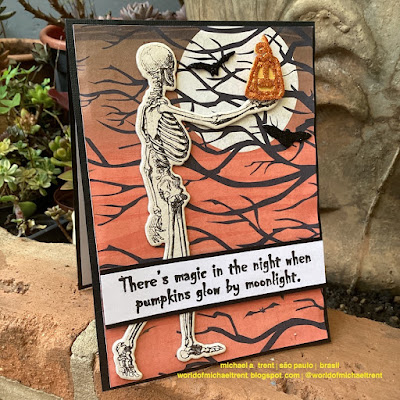
Day 8 Halloween/Autumn Cards 2023 | Pumpkins in the Moonlight | Anthony's Paper Craft


Hello everyone, and welcome to Day 8 of my 31 Days {hopefully} of Halloween/Autumn Cards 2023. 

If I'm being honest, I gave a class today and had no energy to also do a blog post.  But, while cleaning, I found a cool skeleton chipboard (from an old My Mind's Eye Collection) in the bottom of a bag along with the September 2016 Die of the Month from Spellbinders with pumpkins, bats, etc. and an idea started to form.   

  • Since the skeleton is large, I made a 5" x 7" card base using black cardstock.  
  • Then I found this cool paper (moon and tree branches) in the digital version of the Trick or Treat Collection from Carta Bella, designed by Steve Duncan.  
  • I printed the paper, cut it down, layered it on a piece of black fun foam, and then adhered it to the card front.    
  • I adhered the skeleton so the hand was in front of the moon.  
  • Using a few of the dies from the Spellbinders September 2016 Die of the Month kit, I die-cut the 2 bats and the pumpkin using black and orange glittered fun foam and adhered them to the card front. 


  • Lastly, I used the sentiments from the Haunted House 2 set from Anthony's Paper Craft (website being updated).  Part of the sentiment went on the front of the card, and the other part on the inside.  I thought the sentiment went perfectly with the pumpkin in the moonlight. 

Day 8 finished.  I love how this card turned out and hope you guys do too.  I'll be back again tomorrow {hopefully} with another card.  Until then...

Hugs from Brasil.

~Michael

Supplies Used:

Trick or Treat Paper Pack 1 - Digital Version - Just the Paper
Haunted House 2 - Anthony's Paper Craft (website being updated)

Thursday, September 7, 2023

Day 7 Halloween/Autumn Cards 2023 | Technique Junkies | Batty Halloween with Googly Eyes


Hello everyone and welcome to Day 7 of my 31 Days {hopefully} of Halloween/Autumn Cards 2023.  Today is Independence Day here in Brasil, which means that 201 years ago, Brasil declared itself independent from Portugal. Everything is closed but we will heading to an Orange Festival soon and I wanted to post a simple and fun card for Halloween.

Like I said in some of my previous posts, a simple sentiment and a sheet of Halloween paper is all you really need to make a fun card.  

  • I made a top-folding A2 card base using some lime-colored cardstock.  
  • Using the Digital Version of the I Love Halloween Collection, I printed one of the papers (with the bats on them), die-cut it using a 4" x 5.25" stitched rectangle die, and I adhered it to my card front.  
  • I stamped Spidery Halloween on a piece of white cardstock, adhered it to a piece of black cardstock, and then to the card front using foam tape.
  • For the inside of the card, I die-cut another piece of white cardstock using the stitched rectangle die, stamped Wicked Halloween, and adhered it to the inside of the card. 


  • Lastly, I adhered 1 small googly eye - only 1 - to each of the bats.  

Another card done!  

Both of the stamps used on this card are on sale with a 15% discount through tomorrow.  No coupon code needed.  If you like anything else on the Technique Junkies website, you can use my Friends & Family Discount Code to save 10% - TJ10Michael 

Enjoy the rest of your day and, until next time...

Hugs from Brasil.

~Michael

Supplies Used:

Wednesday, September 6, 2023

Day 6 Halloween/Autumn Cards 2023 | Technique Junkies | Drop A House


Welcome to Day 6 of my 31 Days {hopefully} of Halloween/Autumn Cards 2023.  I  love making square cards.  I have so many 6x6 paper pads and it's so easy to just adhere one of the sheets to a card front and work from there.

Today's card is a 5.5" square card using the Drop A House stamp from Technique Junkies and one of the papers from the Hocus Pocus Collection from Echo Park.  It's an older pad and I used the digital version from Snap Click Supply. 

How to make the card:

  • I started by making my card base 5.5" x 11", which I scored in the center.
  • I adhered one of the papers from the Hocus Pocus Collection to my card front and trimmed the excess.  I went with the witch's feet to match the stamp. 
  • I stamped Drop A House on white cardstock and colored it with some alcohol markers and then I die-cut the image using a stitched square die.
  • I die-cut two more pieces of cardstock - orange and purple - in the next 2 larger stitched square dies grabbed my stitched square dies.
  • Lastly, I put all the pieces together.  I adhered the purple cardstock to the center, then the orange, then the stamped image.  
The simple and fast Halloween card is done!    

If you like the Drop A House stamp, it's on sale through this Friday, September 8th and, if you use my code - TJ10Michael - you can save 10% on everything else on the site other than the new release stamps, which are already 15% off.  I might earn a small commission and I want to thank you now for using it.  If you do.  

I hope you liked this fast and fun card.  I'll be back tomorrow for Day 7.  Until then, enjoy your day. 

Hugs from Brasil.

~Michael

Hocus Pocus Digital Collection from Echo Park Papers (Snap Click Supply)

Tuesday, September 5, 2023

Day 5 Halloween/Autumn Cards 2023 | Technique Junkies | Gratitude Cards


Welcome to Day 5 of my 31 Days {hopefully} of Halloween/Autumn Cards 2023.  5 days so far!  I'm on a roll.  :-) Today I went with two gratitude/Thanksgiving cards with Autumn colors.  One has splatters and crystals and the other only has crystals. 

I started making this card for a CAS {clean and simple} card challenge blog.  I have issues making one-layer cards with lots of white space, but I did it.  When I went to post it, the challenge had ended.  Sigh.  But, thankfully, there are several other card challenge blogs that have autumn or autumn-colored challenges and that's where this card will go.  

Links to these challenges are at the end of this post if you want to play along along with a coupon code to save 10% on these stamps.  

To make this card...

I really wanted to use the Worn Leaves Background from Technique Junkies for my focal point.   But I only wanted part of the stamp.  So I cut it!  But I cut it in a way that, if needed, I can put all the pieces together to use for a whole background image.

For my sentiment, I used the "with gratitude" sentiment from the Autumn Framed Sentiments Set of 5, also from Technique Junkies.  I made my two card bases using white cardstock.  Then I placed my card base and the 2 stamps into my Misti and stamped them using the Ombré Autumn ink pad from Hero Arts.  The colors in this ink pad are perfect for Autumn. 


Now to finish the cards.  

I distressed the edges of both cards using the Ombré Autumn ink pad and an ink applicator.  On the first card, I added some splatter, also using the ink pad and a few crystals.  For the 2nd card, no splatter but I added 5 orange crystals.  


Simple, one-layer cards are done!  Do you have a favorite?  I'm actually leaning towards the card with the splatter.  If you love either of these stamps from Technique Junkies, you can save 10% by using my Friends & Family Discount Code - TJ10Michael (I might earn a small commission if you do).

I am entering one of these cards in these card challenge blogs if you want to play along.   


Thanks so much for stopping by my blog today.  I'd love to know what country you are in.  Leave a comment below and let me know.  Thanks!  Until next time...

Hugs from Brasil.

~Michael 

Monday, September 4, 2023

Day 4 Halloween/Autumn Cards 2023 | Technique Junkies | No Skeletons


Welcome to Day 4 of my 31 Days {hopefully} of Halloween/Autumn Cards 2023.  Some of these cards will be on the Technique Junkies Blog because this month is their big Halloween release and I made several cards for them.  

Today's card is a simple Halloween card with a skeleton theme.  I used 1 sheet of black cardstock, 1 sheet of white cardstock (or scraps), the No Skeletons stamp from Technique Junkies, and 1 6x6 sheet of Halloween paper with skeletons on it.      

I will also enter this card on the September Anything Goes challenge on the Two Old Bats Halloween Challenge Blog.  The mood board is below, which includes skeletons and helps with my theme.  :-)


Let's make the card:
  • I started with a top-folding A2 card base from black cardstock.  
  • I wanted paper with skeletons on it to match the sentiment and I found one in the Halloween Market Mega Digital Collection from Carta Bella/Snap Click Supply.  I printed it, die-cut it using a 4" x 5.25" stitched rectangle die, and adhered it to the card front.  
  • Using the same die, I also die-cut a piece of white cardstock (for the inside).
Now for the sentiment.  I wanted the top part of the No Skeletons sentiment for the front of my card and the bottom part for the inside. There are two ways to do this.  You can cut the stamp and have 2 stamps.  But I went the 2nd route.  I covered the bottom part with painter's tape, stamped it on a piece of white scrap cardstock, trimmed it, and adhered it to my card front.


I cleaned the stamp, covered the top part, stamped it on the piece of white cardstock I die-cut earlier, and adhered this to the inside of my card. 


And that finishes my card for today.  Like I said, it's a very easy card to make especially if you need to make a bunch of cards.  

The No Skeletons sentiment is 15% off until this Friday, September 8th (no coupon needed) and, if you want anything else from the Technique Junkies website, you can save 10% by using my Friends and Family coupon - TJ10Michael (I might earn a small commission from your purchase and thank you now for using the coupon).

I'll be back tomorrow {hopefully} with another Halloween or Autumn card and hope you will stop back or subscribe to my blog.  Until then...

Hugs from Brasil.

~Michael

Sunday, September 3, 2023

Halloween/Autumn Card Day 2 and 3 | Technique Junkies | Tawny Owl Sketch 14


Hello everyone and welcome to Days 2 and 3 of my 31 Days [hopefully] of Halloween/Autumn Cards 2023.  My card for Day 2 is below but my step-by-step for the card is on the Technique Junkies Blog.  It's a really fun card using the Spidery Halloween and Halloween Scene Set - and, of course, lots of googly eyes.   I hope you will stop over there to check it out.  I even stamped on the inside of the card. 


For Day 3 - today - I am making a fun and simple Halloween card using card Sketch 14 from Tawny Owl Paperie | Inky Inspiration, a cardmaking group on Facebook run by my friend Crystal.  If you love card sketches, cardmaking, or just want inspiration, this is a great group to join.   

I am adding this to Crystal's TOP Inky Inspiration Sketch Challenge - All the Sketches.  Links to everything I used are at the end of this post.

  • I started by making a top-folding A2 card base using black cardstock.  
  • I printed one of the papers from the Hocus Pocus Paper Collection from Echo Park (links below) and then die-cut it using a 4" x 5.25" stitched rectangle die.  I used a design that had witch's hats on it to match my sentiment. 
  • I used the same 4" x 5.25" stitched rectangle die to die-cut a piece of white cardstock for the inside of the card.
  • I cut 3 pieces of textured cardstock, 4" x 6.25", in purple, orange, and green from the American Crafts Primary Cardstock.  Then I applied double-sided tape to the back of each one.  
  • Using the small and medium dies in the Stitched Strips of Ease Heffy Cuts set from Heffy Doodle, I die-cut the purple cardstock using the small die and the orange and green cardstock using the medium die.  If I cut too many I will just keep them for another project.  If you don't want or like the stitched look, Heffy Doodle also has a non-stitched set, Strips of Ease Heffy Cuts.

  • I adhered the strips of cardstock to my designer paper (as shown in the sketch) using the purple strips between the green and orange strips.  Using double-sided tape on the back before die-cutting the strips makes this so easy. 

    When finished, I trimmed the excess.  


Now to just put it all together.  
  • I cut a piece of fun foam and adhered it under my striped piece, then I adhered this to my card front.
  • I stamped the sentiment, Witch In All of Us from Technique Junkies, on a piece of white cardstock, trimmed it, layered it on a piece of black cardstock, and then to the center of the card.
  • And, lastly, I stamped Wicked Halloween, also from Technique Junkies, on the white cardstock we die-cut earlier and adhered it to the inside of the card.    


And she's done!  Here's the final card.  Like I wrote above, super simple to make.  The most time-consuming part was die-cutting the strips.  Links to everything I used are below.  If you like the stamps I used from Technique Junkies and want to save 10% on your purchase, use the code TJ10Michael at checkout.  I might earn a small commission but it doesn't come from your pocket.  

Enjoy the rest of your day and, until next time...

Hugs from Brasil.

~Michael

Supplies Used:

Friday, September 1, 2023

Technique Junkies September 2023 New Stamp Release | Sale Info | Happy Halloween!


Hello everyone, and welcome to September and the September 2023 New Stamp Release from Technique Junkies.  This month there are 10 new stamps - mostly for Halloween and Fall, which are my favorite cards to make.  I will admit, I do miss Fall in New York - the amazing colors on the leaves, apple picking, the pumpkins and gourds in the supermarket, and the bags of fun candy for Halloween, which we do not have here.  Imagine.  And I love making Halloween and Fall cards.  

All of the stamps in the release are 15% off through Friday, September 8th - no code needed - and, if you use my code - TJ10Michael - you can take an additional 10% off the rest of the website.  


And, for those of you who "want them all", you will love the Gotta Have Them All Deal, in which you save $17.51 by purchasing them all. 


To help kick off the new release, I made this super simple Halloween card using the new Frequent Flyer stamp and a 6x6 paper pad.


  • I started by making a top-folding A2 card using orange cardstock.
  • I die-cut a piece of white cardstock using a 4" x 5.25" stitched rectangle die which I adhered to the inside for a message. 
  • Using the same stitched rectangle die, I die-cut one of the pages from the 6" x 6" I Love Halloween paper pad from Echo Park, which I adhered to my card front.  I went with the witch page to work with the sentiment.  If you like digi papers, you can also find this collection on Snap Click Supply.
  • I stamped Frequent Flyer on white cardstock, trimmed it, layered it on a piece of black cardstock, and then to the card front.
  • Lastly, I used a brown brush marker to add some color to the broomsticks, added a black crystal to each of the broomsticks, and I stamped one of the broomsticks on the inside white piece, and colored it in. 


I have many more ideas this month and I hope that you will subscribe to my blog and Instagram page.  The other Design Team Members also have some amazing ideas and I hope you stop by each of their blogs and show them some love.   


I'd love to know what you think of this card idea - please leave a comment below.  Please check back tomorrow to see another Halloween card using another of the new release stamps.  Until then... 

Hugs from Brasil.

~Michael    

Draped Ornaments Slimline Christmas Card | Technique Junkies | BIG SALE!

  Hello everyone.  I hope y'all are doing well this holiday season.  I've been busy giving some album classes to photography clubs a...