Card No. 1 - November 2020 Crafty Elves Countdown To Christmas - Tourist Snow {People}

Hello everyone. This is a more detailed step by step on how to make Card No. 1 from the November 2020 Edition of the Crafty Elves' Countdown to Christmas. This adorable city scene with a Big Red Bus filled with tourist snow {people} is not a clean and simple card but worth it for someone special in your life.
Links to the other 3 cards as well as links to the other Crafty Elves' cards are at the bottom of this post.
As I mentioned in my main post, the idea for this card has been floating around in my head for almost 2 years and it felt great to get it out. And I love how it came out.
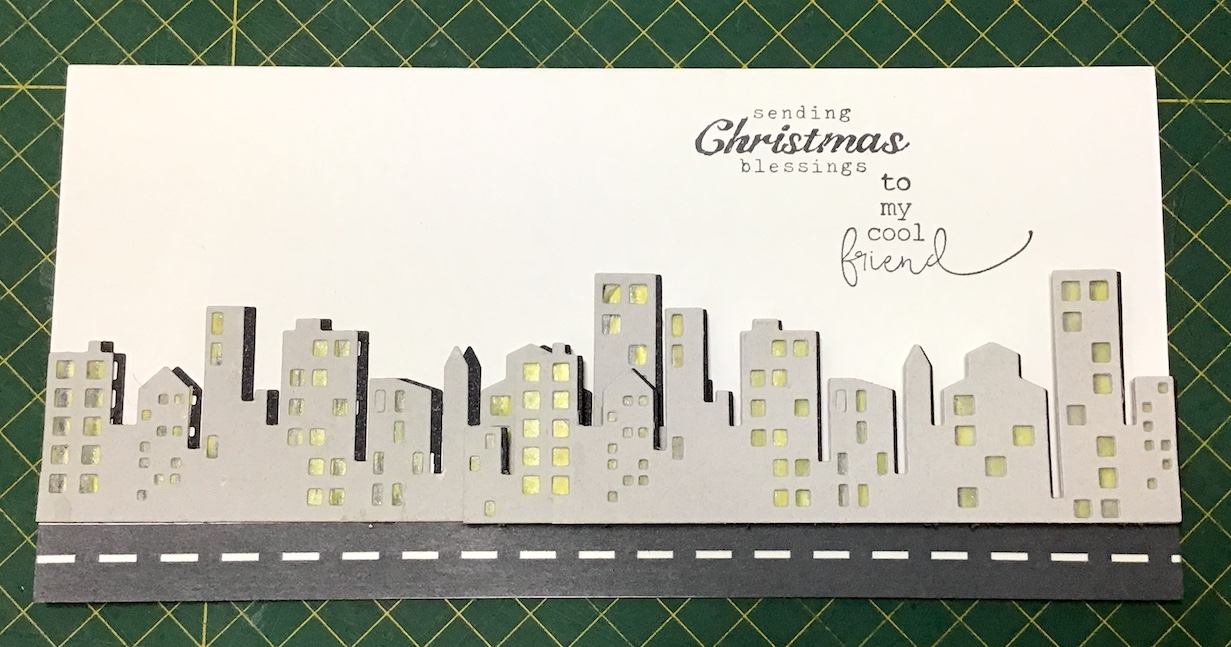
- I started by making a 4.25" x 8.75" top folding slimline card from white cardstock. Along the bottom of the front of the card, I adhered a strip of THIS dotted-line washi tape to act as the road along which the bus is driving.
- I die cut the Memory Box Cityscape Die 4 times. Twice from black cardstock and twice from a grayish/cement cardstock. There are so many skyline/cityscape dies on the market and many would work to make this card.
- I die cut the Memory Box Double Decker die using red/black/and gray cardstock.

- On the back of each of the gray/cement colored cityscapes, I adhered yellow washi tape I had in my stash - to give the look of lights. I am pretty sure there is a solid cityscape die to go with the one I am using but, as usual, I cannot find it and thought the washi did a good job. If the washi tape is too sticky thru the windows, you can just brush on some cornstarch to remove the stickiness. Mine was fine.

- Next, I applied some wet glue to the washi tape side and adhered them to the black cityscape pieces but offsetting them by about 1/16th of an inch to give a small shadow. You can also use double sided tape if you want.


Before I can start to put the card together, I stamped my sentiments. I already know that the right side of the card front will be 3D with foam tape and I want to make sure I will not have a problem stamping the sentiments.
- Without glueing anything down, I arranged the cityscape where I expect to adhere it and then, using a stamp positioner, I stamped my first sentiment "sending Christmas blessings" by Unity Stamp.

- Then I stamped the 2nd sentiment "to my cool friend" from Snow Way also by Unity Stamp.


Now...we can put together the card front!
- I adhered the two cityscapes to the front, above the washi tape. The left side I glued down and the right side I adhered using foam tape so it was raised.
Before I can add the Big Red Bus I need to insert the snow {people} coming out the windows. So I stamped 7 of the snow people from the Snow Way set from Unity Stamp, fussy cut them, and then I colored them in.

Next, I adhered the silver stairs to the bus with glue. Then I positioned each of the snow {people} coming out the windows of the bus adding a dab of glue where necessary to keep them secure.

Then I put some foam tape on the back of the bus and adhered it on the left side of the card front. I also adhered the bus tires using wet glue.

The last things I did to finish off the card - stamp the snowflake using blue ink that is part of the Snow Way set and to add various Stickles to the snow {people} and their hats.


Done! It feels great to finally have this out of my brain. I hope you guys enjoy this card as much as I had making it. I love a good whimsical fun card. I'd love to know what you think.
For a more detailed step by step, with photos, of the other 3 cards, click below -
For a more detailed step by step, with photos, of the other 3 cards, click below -
And for the other Crafty Elves's posts -
Debra - Meticulosity
Lisa - Life of a BZscrapper
Thanks so much for stopping by the blog today. I hope everyone that celebrates it has a great Thanksgiving. There is a lot to give thanks for this year.
Hugs from Brasil!
~Michael
Hugs from Brasil!
~Michael
.jpeg)
.jpeg)

Awesome card Michael! I wish I had those die cuts, they’re probably not here in the USA.
ReplyDelete