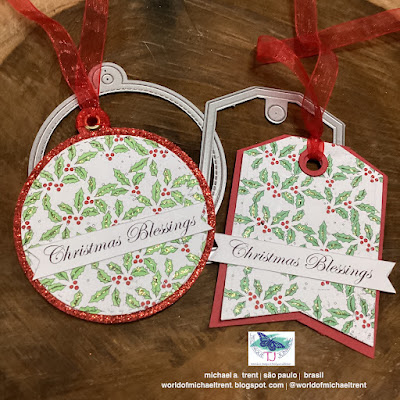
He Made It/She Made It | Holly and Berries | Christmas Ornament or Tag
Hello everyone. Today is Friday the 13th. In October. Yikes. But, today is also a new He Made It/She Made It collaboration with my friend Debra of Meticulosity and we decided to post today to bring some light on such a dark day. haha!
This month we decided to use the brand-new Holly and Berries stamp, which is part of the October 2023 New Release from Technique Junkies.
Having already made a card using this stamp, which you can see here, I wanted to do something different and out of the box. As I was stamping Holly and Berries on a piece of white cardstock, inspiration struck. And the idea of either an ornament or a tag, or both popped into my head.
- I stamped Holly and Berries on white cardstock using Tuxedo Black Memento Ink.
- I used a circle die to cut part of the stamped image, colored it using a green and red marker, added some green stickles to the holly leaves, and set it aside to dry.
- Once dry, I die-cut 2 pieces of red glittered fun foam (you can use red cardstock) using the largest die from the Stitched Circle Tags from Lawn Fawn. I adhered the two pieces together, and adhered the Holly and Berries circle to one side.
- I die-cut another circle, stamped one of the sentiments from the Gifts of Christmas Set of 5, and adhered it to the other side.
- Lastly, I stamped Christmas Blessings, die-cut it using a banner die, adhered it to the front, and added a red ribbon.
- For the tag tag/ornament, I used the larger tag from the Tag Me Confetti Cuts from Reverse Confetti. Sadly, Reverse Confetti has closed but I loved the size of this tag. I colored it, added green stickles to the holly leaves, and set it aside to dry.
- For the red tag, I traced the white piece and cut it making it about 1/8" larger than the white piece.
- I die-cut another piece of white using the tag die, which I adhered to the back of the red tag, tied all the tags together using a piece of red ribbon.
- Lastly, I stamped Christmas Blessings, die-cut it using a banner die and adhered it to the front of the tag.
For the reverse side of the tags.
Either of these ideas would be great as an ornament for a tree, a tag for a present, or even tied around a bottle of wine or liquor. Just add "To" and "From" or a message and you are done. I'd love to know what you think of this idea. And, if you like the stamps I used or anything else from the Technique Junkies website (stamps, stencils, etc.), you can save 10% by using my code at checkout - TJ10Michael.
Now it's time to head over to Debra's blog and check out what she made. You can also find her on Facebook and Instagram. You can also find me on Facebook and Instagram. Until next time...
Hugs from Brasil.
~Michael


.jpeg)
.jpeg)
Comments
Post a Comment