Posts

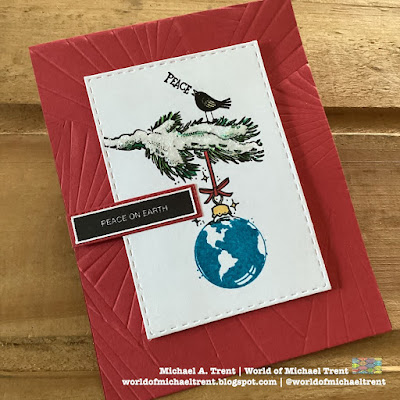
2025 Card 4 | Woodblock Wednesday | Use Your Stash | Christmas Card Idea
Image
  Hello everyone and welcome to my first Woodblock Wednesday post of 2025.  This is the day of the week in which we try to set aside some time during the day to use some woodblock stamps that may not have been used in some time or, maybe, have never been used.   For today's card, I pulled 2 VERY old woodblock stamps out of my stash: a snowy branch with a world ornament hanging off it - from Viva Las Vegas Stamps .  I searched high and low on their site for the stamp but could not find it.  I assume it's been retired.   The other stamp is called Peace Bird (1697-H) from Rubber Soul  - from 2008 and also long retired.  I remember buying both of these stamps from The Ink Pad in NYC (closed) just to make today's card.  It only took me 17 years.   I started by stamping the snowy branch with the ornament on a piece of white cardstock using Onyx Black Versafine Ink and Mermaid Lagoon from Ranger.  White the inks were still w...

2025 Card 2 | Caffeinated Christmas Card Challenge | Snowflakes | Stamplorations

Image
Today I would like to share with y'all my 2nd card for 2025 - a slimline "coffee-themed" Christmas card for the Caffeinated Christmas #37 card challenge on Coffee Loving Papercrafters . The theme is "snowflake" and, of course, it has to have a coffee, cocoa, or tea theme included also.   Let me show you how I made this card.  I printed Coffee Cup Row from Stamplorations on a piece of white cardstock, die-cut it using a 2 5/8" x 7 5/8" slimline die, colored the cups using 5 different alcohol markers, and adhered a piece of fun foam to the back. Using a snowflake stamp I found in an old Avocado Arts (out of biz) stamp set, I stamped a snowflake on the front of each cup using Jet Black Archival Ink.    I made a top-folding 3" x 8" white slimline card base. I die-cut a piece of red cardstock using a stitched slimline die and adhered it to my card front.    I adhered my colored cups to the front of the card. I stamped 3 sentiments, die-cut them...

2025 Card 1 | You Make Me Smile | Angie Blom Digital Designs

Image
  Hello everyone and welcome to the year 2025.   Made my first card of the year - a white on white card - using two digital sets from Angie Blom Digital Designs .  The flowers on the front of the card are from Magical Story .  After I pulled the image into my editing program, I duplicated the image and flipped it so the 2 images met in the center, and colored the images using some ultra fine tip BIC markers. Then I printed one of the sentiments from Christmas Joy Mugs , die-cut it using a stitched banner die, layered it on a piece of purple cardstock, and adhered it across the center of the card where the 2 images met.  All I added were some Yellow Stickles and little dots of Glossy Accents to the front. Below are links to the stamps sets I used if you want to check them out.   Magical Story: https://angieblomdigitaldesigns.com/products/magical-story Christmas Joy Mugs: https://angieblomdigitaldesigns.com/products/christmas-joy-mugs Here is a clos...

Angie Blom Digital Designs | Bloom Grow Blossom | 3D Slimline Card

Image
  Hello everyone.  I hope y'all are doing well and have recovered from the holiday.  Today I am sharing a slimline card I made using  Bloom Grow Blossom  from Angie Blom Digital Designs .   What's great about Angie's kits is, that you not only get the individual images, but you also get a sheet or two with the images already put together like a card.  All you need to do is print that page, color it, and send it.   To make this card: I made a top-folding slimline card using white cardstock - 3.5" x 8.5". I adhered a piece of decorative paper from my stash to the front of the card. I printed the slimline design that is part of the set, colored it using Tombow markers, layered it on a piece of black cardstock, then a piece of fun foam, and then to the card front.   The markers I used were 173/Willow Green, 761/Carnation, and 055/Process Yellow. I liked it.  It was OK.  But it wasn't what was in my head.  It's too bo...

Tulip Birthday Card | Angie Blom Digital Designs

Image
  Hello everyone.  Hope everyone had a nice Christmas or a nice first night of Hanukkah, if you celebrate.  Christmas day was a very quiet day.  While we watched Christmas holiday movies, I colored a bunch of new digital stamps from Angie Blom Digital Designs that I got the other day as an early birthday gift to myself.  She's having a sale y'all - 50% off site wide, no coupon needed, and it runs until the end of the year.  I have no affiliation with Angie Blom and just love to share with my followers the brands I love to use.     I'm trying to get a jump on holidays/celebrations for 2025 and today I made a birthday card using stamps from 2 different sets -  Tulip Hello  and Let's Party Birthday .   I printed one of the designs from Tulip Hello, die-cut it using a 3.75" x 5" stitched rectangle die from Pink & Main, and colored the image using some alcohol markers that I picked up here in Brasil.  I knew I was goi...

Draped Ornaments Slimline Christmas Card | Technique Junkies | BIG SALE!

Image
  Hello everyone.  I hope y'all are doing well this holiday season.  I've been busy giving some album classes to photography clubs and making special order albums for some people in town.  Today I just had to make a card for a change of pace.  The stamps I used are on sale and that info is at the end of today's post.  Today's card is a slimline Christmas card using 2 stamps from Technique Junkies - Draped Ornaments  and Dotted Merry Christmas .  I also used 2 dies from the Essentials: Slim Stitched Rectangle Die Set from Pink Fresh Studio .   I made a 3 5/8" x 8.25" slimline card base by cutting a piece of white cardstock, 7.25" x 8 5/8"", then scoring on the short side at 3 5/8".  Folded it in half, burnished well, and I had my base.   Using the largest of the slimline dies from the Pink Fresh Studio Slim Stitched Rectangle Die set, I die-cut a piece of red cardstock and adhered it to my card front.   If you do...

Harry Potter Mini Album | Your Book of Memories Tutorial | Paper House Productions Papers

Image
  Hello everyone!  Today I am thrilled to share a Harry Potter Mini Album I recently made for a "Find My Mojo Challenge " on the Your Book of Memories Community .  I had lost a bit of my mojo and we decided to have a 2-week challenge to make an album using the Ho Ho Hello Mini Album Tutorial with any themed paper collection we wanted to use.  I made a Harry Potter-themed album using some of the coolest Harry Potter papers from Paper House Productions .   Below is a walkthrough of the album, which you can also find on my World of Michael Trent YouTube Channel .  Below the video are photos of the album, and, at the end of this post, are links to what I used as well as coupon codes for Your Book of Memories and Paper House Productions.     Photos of the book: Front of album showing Hogwarts. Back of album showing the Newspapers. Spine of album.  Inside pocket, photo mats, photo flip page. More photo mats in deep pocket.  5" x 7" ...