Friday, October 27, 2023

Cutesy Wootsy Halloween Mini Album with Salty Beach Scrapper


Hello everyone.  Today I am sharing another Halloween album I made using a really fun collection called Cutesy Wootsy Halloween from Salty Beach Scrapper.   I fell in love with this collection - probably because it's not made with traditional Halloween colors - they are more pastel - and I love this idea.  And some of the pages are just too stinking cute!  

Inspiration for this book came from both Salty Beach Scrapper and Pink Monarch Prints and links to their social media pages are at the end of this post. 

This post is short and sweet because the video, below, explains everything about the book, the paper collection, and the idea behind the belly band on the last page of the album.  If you love the paper, you can get it for free from Salty Beach Scrapper.  THIS video explains it all.  Just follow Kim's instructions.  

The idea behind the belly band on the last page of the album comes from THIS video by Pink Monarch Prints.  Although Pink Monarch Prints does junk journals, I love to watch her videos for ideas that I might be able to use in my own albums.  She also has amazing digital kits. 

Here is a video walk-thru of the album, which is also on my YouTube Channel.  


 Here are photos of the book and the pages.  


This is the page with the belly band that I talk about in the video. 
I got the idea for this from watching THIS video from Pink Monark Prints.  


Social media pages are below.  It would be great if you checked everyone out.  There is a lot of amazing inspiration.  


Thanks so much for stopping by my blog today.  I'd love to know what you think of the album and the paper collection.  Until next time...

Hugs from Brasil.

~Michael

Wednesday, October 25, 2023

Hocus Pocus Halloween Mini Album with Carta Bella


Hello everyone and Happy "Almost" Halloween.  Today I am sharing a mini album I made (my own design) using the Hocus Pocus Collection, which was designed by Steven Duncan for Carta Bella.  I LOVE this paper collection - just so you know.  

I made a video walk-through of the album, which is below and also on my YouTube Channel.  


Here are some photos of the book and the inside pages.  But to really understand the ins and outs of the book, I suggest that you watch the video.  


The Paper

I used the Hocus Pocus Collection Kit from Carta Bella to decorate this album.  If you would like to use the same collection, I would first check with your local scrapbook store to see if they have it in stock.  If not, you can find it at the links below - at least at the time this blog post is published.  

If you would like the digital version, you can only find it on Snap Click Supply and you can buy the whole collection (the Mega), just the papers, or just the elements.  Links are all below. 

**Note: There is a collection called Hocus Pocus from both Carta Bella and Echo Park.  Make sure you are buying the correct one - if that matters to you.

Hocus Pocus Full Collection (papers and elements) 

The Designer 

As I mentioned in my video, Steven Duncan designed this paper collection for Carta Bella (and many others).  If you would like to check out more of his work - not just paper-related - click HERE.

Thanks so much for stopping by my blog today (and hopefully my YouTube Channel).  I'd love to know what you think of the book and the papers.  Leave me a comment below.  Thanks and...until next time...

Hugs from Brasil.

~Michael

Tuesday, October 24, 2023

Crafty Elves Countdown to Christmas - October 2023 - Christmas Ornaments Slimline Card


Welcome to the October 2023 Edition of The Crafty Elves Countdown to Christmas.  If this is your first time here, on the 25th of each month, I collaborate with some other Crafty Elves - Debra of Meticulosity and Lisa of Life of a BZ Scrapper - to bring you some holiday card-making inspiration.   If you would like to be a Guest Elf for one month, just let me know in the comments.    


This month I made a slimline card using the Ribboned Ornaments stamp from Technique Junkies.  This was just released on October 1st and as soon as I got it, I knew I would have to turn this into a slimline card.    

  • The first thing I did was to stamp Ribboned Ornaments with Tuxedo Black Memento ink on a piece of white cardstock.  
  • Using a stamp positioner, I stamped the image again so that it looked like one long string of ornaments.  Using a stamp positioner rather than a Misti or other stamping platform, allows me to line up the image perfectly. 
  • I used my BIC Intensity markers to color all the ornaments and ribbons.
  • I trimmed my image to 8" long and fussy cut along the bottom of the ornaments.
  • I made a 3.5" x 8.25" slimline card base using red cardstock and adhered a piece of gold foil paper, 3.25" x 8", to the card front.  The gold foil paper is from the Field Notes Companion Set by SEI.   
  • I put foam tape/dots behind the colored Ribboned Ornaments and adhered it to the gold foil paper. 
  • For the inside, I stamped Christmas Blessings on a piece of white cardstock, trimmed it, and adhered it to the inside for a message.
  • I also added some "brasilian" stickles to the snowflakes on some of the ornaments.  Then I set it aside to completely dry. 


Once the glitter glue was fully dry, the last thing I did was to use a "glossy accents" product on all of the ornaments so that, once dry, they would be glossy and glass-looking.  


I hope you have enjoyed this card and I really hope you will find time to visit the other Crafty Elves and see what they made.  Their links are all below.  

Michael - World of Michael Trent

Debra - Meticulosity
Blog (today's card)

Lisa - Life of a BZ Scrapper
Blog (today's card)

Thanks so much for stopping by my blog today.  I would love to know what you think of this card idea - leave a comment below and, until next time - 

Hugs from Brasil.

~Michael

Thursday, October 12, 2023

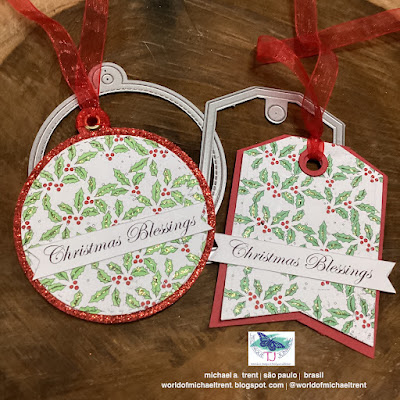
He Made It/She Made It | Holly and Berries | Christmas Ornament or Tag


Hello everyone.  Today is Friday the 13th.  In October.  Yikes.  But, today is also a new He Made It/She Made It collaboration with my friend Debra of Meticulosity and we decided to post today to bring some light on such a dark day.  haha!

This month we decided to use the brand-new Holly and Berries stamp, which is part of the October 2023 New Release from Technique Junkies 


Having already made a card using this stamp, which you can see here, I wanted to do something different and out of the box.  As I was stamping Holly and Berries on a piece of white cardstock, inspiration struck.  And the idea of either an ornament or a tag, or both popped into my head.

  • I stamped Holly and Berries on white cardstock using Tuxedo Black Memento Ink.  
For the circle tag/ornament:
  • I used a circle die to cut part of the stamped image, colored it using a green and red marker, added some green stickles to the holly leaves, and set it aside to dry.  
  • Once dry, I die-cut 2 pieces of red glittered fun foam (you can use red cardstock) using the largest die from the Stitched Circle Tags from Lawn Fawn.  I adhered the two pieces together, and adhered the Holly and Berries circle to one side.  
  • I die-cut another circle, stamped one of the sentiments from the Gifts of Christmas Set of 5, and adhered it to the other side. 
  • Lastly, I stamped Christmas Blessings, die-cut it using a banner die, adhered it to the front, and added a red ribbon.
For the Tag tag/ornament:
  • For the tag tag/ornament, I used the larger tag from the Tag Me Confetti Cuts from Reverse Confetti.  Sadly, Reverse Confetti has closed but I loved the size of this tag.  I colored it, added green stickles to the holly leaves, and set it aside to dry. 
  • For the red tag, I traced the white piece and cut it making it about 1/8" larger than the white piece.  
  • I die-cut another piece of white using the tag die,  which I adhered to the back of the red tag, tied all the tags together using a piece of red ribbon.  
  • Lastly, I stamped Christmas Blessings, die-cut it using a banner die and adhered it to the front of the tag.  

For the reverse side of the tags.


Either of these ideas would be great as an ornament for a tree, a tag for a present, or even tied around a bottle of wine or liquor.  Just add "To" and "From" or a message and you are done.  I'd love to know what you think of this idea.  And, if you like the stamps I used or anything else from the Technique Junkies website (stamps, stencils, etc.), you can save 10% by using my code at checkout - TJ10Michael.

Now it's time to head over to Debra's blog and check out what she made.  You can also find her on Facebook and Instagram.  You can also find me on Facebook and Instagram Until next time...

Hugs from Brasil.

~Michael

Sunday, October 1, 2023

Technique Junkies October 2023 New Stamp Release | Christmas Blessings | Christmas Card


Hello everyone, and welcome to the October 2023 New Stamp Release from Technique Junkies.  This month there are 12 new stamps and it's all about Christmas, Hanukkah, and even a beautiful stamp that can be used for a New Year card.    

All of the stamps in the release are 15% off through Sunday, October 8th - no code needed - and, if you use my code - TJ10Michael - you can take an additional 10% off the rest of the website.  

If you love them all, take advantage of the Gotta Have It All deal where you get the 12 new stamps for $95.99 - normally $121.35 - so you save $25.36 with this deal.  It's like getting 2 or 3 stamps free. 

To kick off this new release, I made this Christmas card using two of the new stamps - Holly and Berries as my background image and Christmas Blessings for my sentiment. 


  • I made a top-folding A2 card using red cardstock.  
  • I stamped Holly and Berries on white cardstock. colored the leaves and berries using 2 Ultra Fine Tip BIC Intensity Markers - Rambunctious Red and Lime Sorbet, and adhered it to my card front.
  • I stamped Christmas Blessings on a scrap piece of white cardstock, die cut it using a stitched banner die, adhered it to a piece of red cardstock, and then to the card front - towards the bottom.
  • Lastly, I adhered a piece of white cardstock to the inside for a holiday message and added some stickles to the card front for shimmer and shine.  
I will be showing many more ideas this month on how you can use the new stamps.  If you want to see what I do, make sure to follow the Technique Junkies Blog, my Blog - World of Michael Trent, or my Instagram Page - World of Michael Trent


I'd love to know what you think of the new release and this card - leave a comment below.  I'll be back soon!  Until then...

Hugs from Brasil.

~Michael    

Coffee and Cards with Deb and Celeste | Father's Day Edition

  Hello everyone and Happy Father's Day to those that are celebrating.  Today I am joining my friends Deb ( Meticulosity ) and Celeste ...