The Crafty Elves' Countdown to Christmas - August 2021 Edition
Hello everyone and welcome to the August 2021 edition of The Crafty Elves' Countdown to Christmas. The Crafty Elves - Debra of Meticulosity, Lisa of Life of a BZScrapper, and myself are being joined by another Guest Elf - a real Elf - Misty, The Jolly Fat Elf herself!
I hope you like the card ideas I came up with this month. Links to the other Crafty Elves' projects and social media links are at the end of this post.
Now, on to my cards!
Card No. 1
I have to admit that I kinda cheated on this card but I think it's a super easy idea and this card is very fast to make using this idea. Hero Arts makes some very affordable small clear sets for about $8 which are packaged in a way that you don't always need to remove any of the stamps to make a card. I used Sparkle Clear World Christmas (CL253)/retired and, if you look at the link, you can see that you can use this as it is packaged.
- I started by removing the stamp set from the package and adhering it to my Misti using some painter's tape. I took the tree stamp out, stamped the image on white cardstock using Onyx Black Versafine ink, then heat embossed it with clear embossing powder.
- Using a clear block, I then stamped the tree with a green ink pad.
- I made a top-folding A2 card base of white cardstock to which I adhered a piece of decorative Christmas paper.
- Then I die cut the image with a stitched rectangle die, layered it on a piece of red cardstock cut with the next size stitched rectangle die.
- I adhered a piece of fun foam behind the red cardstock which I then adhered to the card front.
- The last thing I did was to adhere some small clear crystals to the tree on the card front.
Card No. 2
- Using Pages on my Mac, I imported Santa's belt and the sentiment "Just Believe" onto a 3" x 8" card front.
- Then I printed them out - three times - on white cardstock, gray cardstock, and then on a piece of gold cardstock. Because the gold has a sheen I was able to emboss it with a black embossing powder.
- I extended the lines of the best using a black marker and then I fussy cut it out. I also fussy cut the belt buckle, including the inside.
- I adhered the buckle to the belt and then the whole thing to the white cardstock above the "Just Believe" sentiment.
- Then I made my card base from white cardstock - 3 5/8" x 8 5/8".
- Using the Slim Stitched Rectangle Die Set from Pink Fresh Studio, I cut a piece of decorative paper with the largest stitched die, which I then adhered to the card front, and then a piece of red cardstock using the largest straight edge die, which I adhered to the decorative paper.
- Lastly, I adhered the white cardstock to the red.
- I started by stamping the image with Onyx Black Versafine ink and then embossing it with clear embossing powder. I also stamped it a 2nd time but only for the center part with the sentiment. Then I trimmed the images.
- Then I colored in the images using some CIS/GRAF alcohol markers (a Brasilian brand) and a Rambunctious Red BIC Intensity Ultra Fine Tip Marker for the sentiment.
- Next, I used Glossy Accents on all the bulbs and the whole sentiment. Then I put it to the side to dry completely. This will take several hours.
- Once fully dry, I layered it on a piece of red cardstock, then decorative cardstock. Then I adhered the sentiment using foam dots to give a 3D effect.
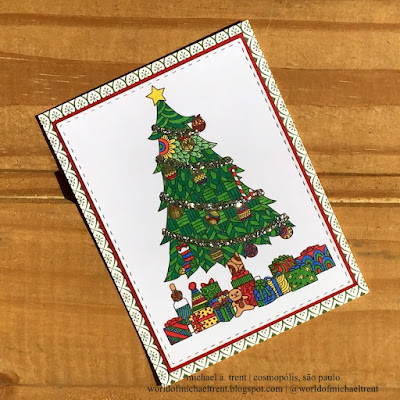
- I started by importing the Christmas Tree image into Pages and printed it out on white cardstock. Then I die cut the image using a stitched rectangle die.
- Then I took my time and colored the image using a few BIC Intensity Ultra Fine Tip markers. The fine tip on these markers is perfect for images like this.
- I also added some Silver Stickles (Ranger) to the garland.
- I made a top-folding A2 card of white cardstock to which I adhered a piece of red cardstock and then the colored Christmas Tree image.
Debra's Blog Post - Meticulosity
Lisa's Blog Post - Life of a BZscrapper
My IG Page - worldofmichaeltrent
Misty's IG Page - The Jolly Fat Elf
Until next time...hugs from Brasil!
~Michael


.jpeg)
.jpeg)
Great coloring on all of your lovely cards. Love all the glossy accents on the bulbs card.
ReplyDeleteWonderful variety. I like the colorful bulbs.
ReplyDeleteGreat cards Michael! Love how you left all the stamps in the set together as they came. Such a perfect idea for that set and very creative! Thanks for sharing!
ReplyDeleteGreat cards! Card 2 is my fave.... perfect for the slimline format!
ReplyDelete