Valentine Two Hearts Shaker Card

Hello everyone and welcome to 2019!!! I hope everyone had a great holiday and New Year's Eve!! Here it was super hot but the fireworks over the city on New Year's Eve was really nice (but not for the dogs). My mojo also took a bit of a holiday for the last 2 months but it's back and I have more projects in the works than the time to make them.
My first project for this year is a design team project for Anthony's Paper Craft - a square Valentine shaker card using the Valentine's Day 2. For the next 3 weeks, each Friday, the design team will have a project for you showcasing this set. If you place an order online and add this SOTM set to your cart, your whole order will ship for free (USA only).
My first project for this year is a design team project for Anthony's Paper Craft - a square Valentine shaker card using the Valentine's Day 2. For the next 3 weeks, each Friday, the design team will have a project for you showcasing this set. If you place an order online and add this SOTM set to your cart, your whole order will ship for free (USA only).
To make this card, let's start with a list of the supplies you will need -
Valentine's Day 2 from Anthony's Paper Craft
Stitched Square Dies - Gina Marie Designs
Foam tape
Various sequins, seed beads, and/or glitter
White cardstock for the base and the back of the shaker
Decorative cardstock or paper for the card front
A piece of acetate, 4" x 4"
You will also need the usual stuff - a paper cutter, scoreboard, bone folder, glue or tape of your choice, black ink
Now for the step by step:
First, I made my card base. I took a piece of white cardstock, 4.25" by 8.5", scored on the long side at 4.25", folded in half and burnished. I then adhered a piece of decorative paper to the card front.
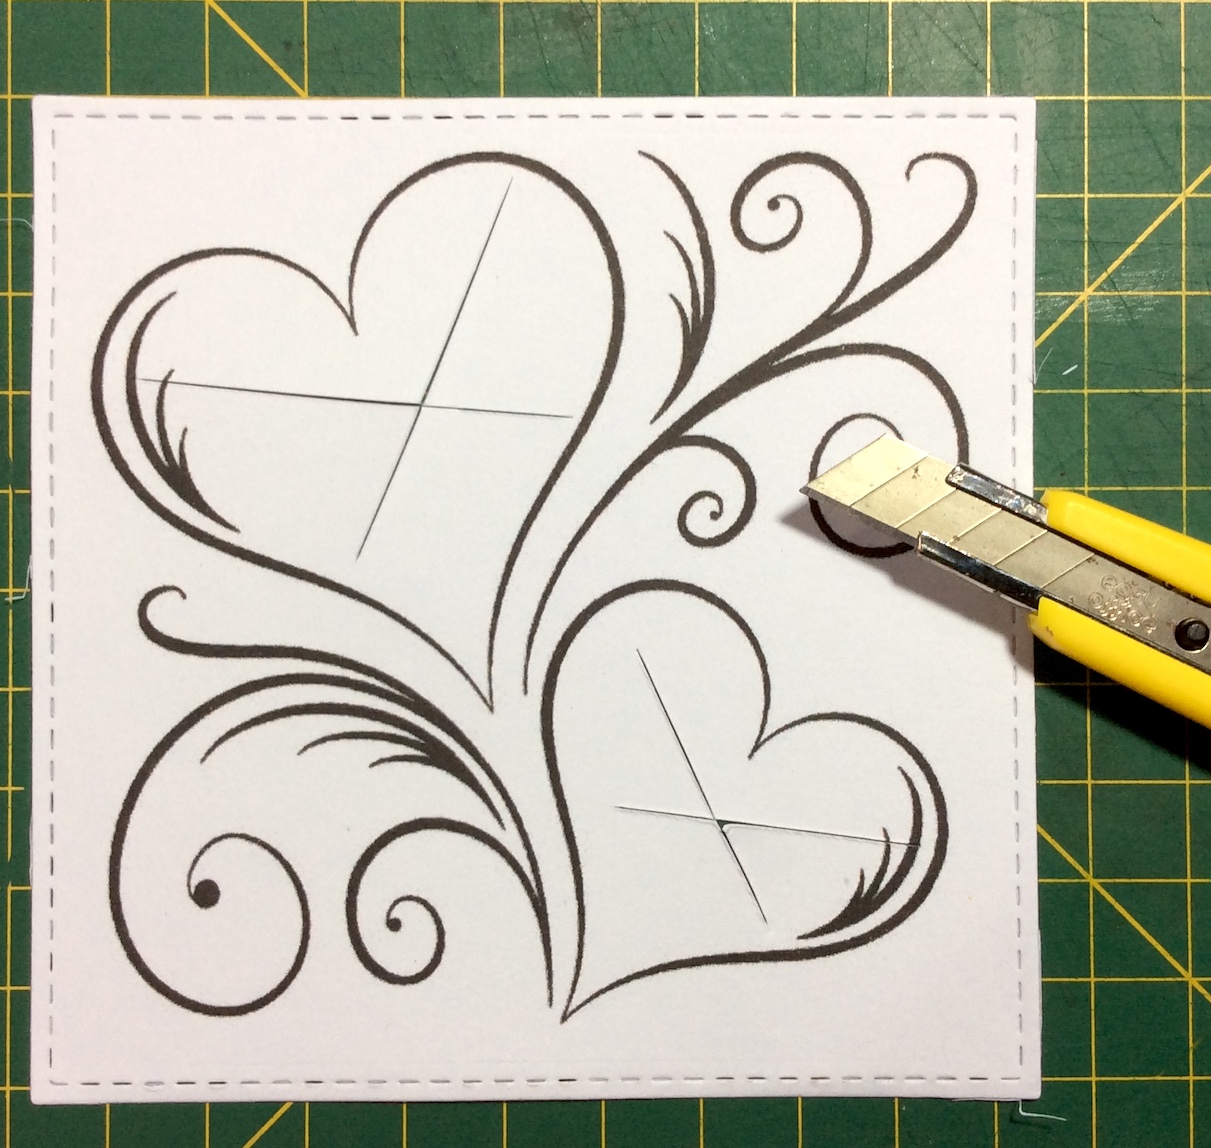
Next, I stamped the hearts/flourishes and a sentiment from Valentine's Day 2 on to white cardstock. I cut the hearts/flourishes out with the largest of the stitched square dies (4" square) and the sentiment, using a banner die (from Spellbinders SDS-006).

Using an x-acto knife, I made two slits in each heart (to make it easier to cut) and then I took fine tipped scissors (Martha Stewart) and cut out the hearts. Make sure you cut on the inside of the heart, to leave the black border, not on the outside of the border.

Using an x-acto knife, I made two slits in each heart (to make it easier to cut) and then I took fine tipped scissors (Martha Stewart) and cut out the hearts. Make sure you cut on the inside of the heart, to leave the black border, not on the outside of the border.

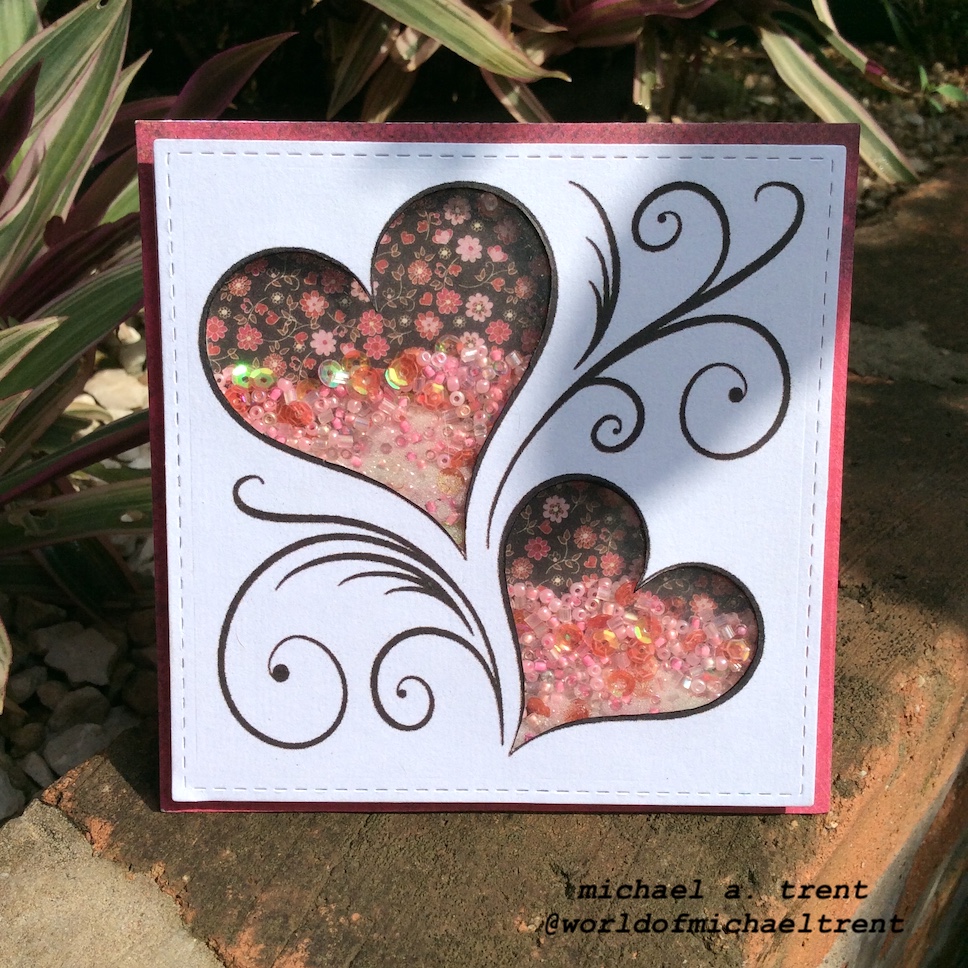
Cut a piece of acetate just shy of 4" x 4" and adhere it to the BACK of the hearts image. Then, using foam tape strips or foam pieces, adhere the foam around the hearts and around the edge.

Now...if you have an anti static pad (used with embossing powders) rub it inside the hearts and around the edges of the tape to remove any static. This helps the sequins and beads to not stick.
Then, fill each of the hearts with what you want to shake around. I used red/gold small sequins, some pink seed beads, and some clear seed beads. I also cut another piece of decorative paper, just shy of 4" x 4", to adhere to the back. (Remember that the design will show inside the heart - so if you are using double-sided paper, note which side you want to show).

The front will now show your pattern inside the hearts with the sequins, beads, etc.

The back will show whatever the back of your paper was. For me, it was white because I used single-sided paper.

Apply your favorite adhesive to the back and adhere to your card front.
That's it! Super simple to make. I think the most time consuming part of this card is the foam tape on the back. LOL. I hope you give this idea a try and I would love to know what you think of the card.
Thanks for stopping by the blog today and, until next time -
Hugs from Brasil -
Michael
Thanks for stopping by the blog today and, until next time -
Hugs from Brasil -
Michael
.jpeg)
.jpeg)

This is really, really beautiful.
ReplyDeleteExtraordinary as always Michael. Thanks again 😁
ReplyDeleteBeautiful!! ❤❤❤
ReplyDeleteAbsolutely Beautiful!!!
ReplyDeleteAppreciate this bllog post
ReplyDelete