A Test To Seal Dylusions Sprays and Acrylic Paints
.jpeg)
I am one of the moderators on the StencilGirl Club Facebook Page and one of the members asked a question last night about how to seal a project in which she had used Dylusions sprays, some acrylic paints and some pens. Well, let me say right here - I am NOT an artist. Well, not a trained one. I never remember what to use with what and am always making tests on small pieces of paper to see what happens. So, why not do a test this time?
To be honest, this was a lot of fun for me. I tend to always grab the same mediums. Tonight I just played! I put paints on top of mod podge. I used distress inks over molding paste. It was so much to just play and see what happens. And I really LOVE how these pieces came out.
So - the testing....
First thing I did was take a sheet of watercolor paper, which I did NOT gesso, and sprayed it with some Dylusions sprays (London Blue, Postbox Red, Pure Sunshine, and Fresh Lime - if you need to know). I removed any excess with a paper towel and then dried with a Ranger heat gun. Then I cut it into 4 equal pieces.
.jpg)
Piece 1 - First I applied a layer of Matte Gel Medium by Liquitex and heat set. The colors from the Dylusions sprays did not run.
.jpeg)
Then I used Chevron Set No. 3 (L245), by Andrew Borloz for StencilGirl, with molding paste and heat set. Then I went back and put the stencil back over the molding paste and applied Distress Inks with a dauber (Spiced Marmalade, Salty Ocean, Mustard Seed, and Picked Raspberry - if you want to know). Then I heat set that.
.jpeg)
.jpeg)
I also outlined the Chevrons with a white Signo pen and stamped the phrase in Versafine Onyx Black from a set by Leave Memories that I found in my stash. This set is so old that I can't even find the company anymore online. Sad.
.jpeg) |
| Final piece before sealing. |
Piece 2 - I applied a layer of Glossy Mod Podge and heat set. Again, the colors from the Dylusions sprays did not run. I then adhered Circles 9, by Michelle Ward for StencilGirl Products, with painters tape and applied white acrylic paint with a makeup sponge. The brand I used was Artist's Loft Titanium White - Academic Level. From Michael's I think. Hey, I told you - I am not a schooled artist. LOL
.jpeg)
I LOVE how this came out and hope that the paints do not run or smear when I apply a seal coat.
.jpeg) |
| Final piece before sealing. |
Piece 3 - I did not seal the Dylusions sprays.
I have to admit - I love how the stencil design looks with the Titanium White in Piece 2, above. So I did the same for this piece but used the Hebrew Calligraphy Hamsa Stencil by Jessica Sporn for StencilGirl. I also mixed the white paint with an Iridescent Medium, also by Artist's Loft.
I have to admit - I love how the stencil design looks with the Titanium White in Piece 2, above. So I did the same for this piece but used the Hebrew Calligraphy Hamsa Stencil by Jessica Sporn for StencilGirl. I also mixed the white paint with an Iridescent Medium, also by Artist's Loft.
.jpeg)
 |
| Final piece before sealing. |
Piece 4 - Again, I did not seal the Dylusions sprays.
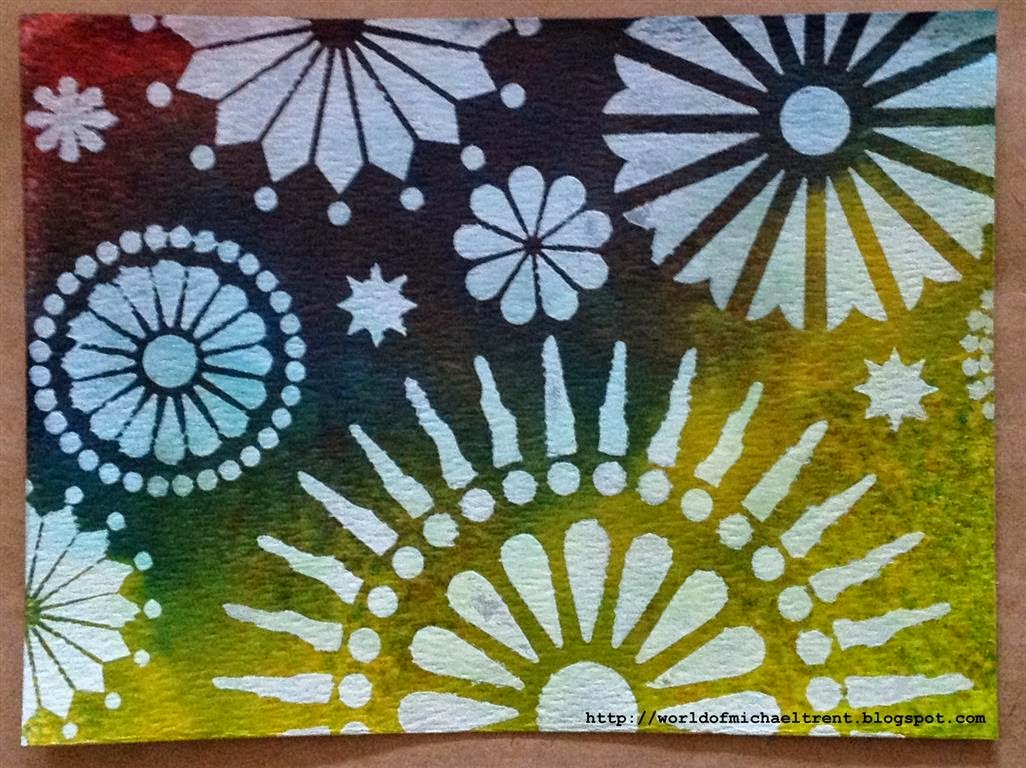
I adhered the Swirly Flower stencil, by June Pfaff Daley for StencilGirl, to the card front with painter's tape on the back. Then applied some Prussian Blue acrylic paint through the stencil with a makeup sponge. When dry, I applied some silver acrylic paint over the cobalt blue in certain places. Heat set both times. The paints are artist grade from a Brasilian company. Then I stamped Happy Birthday (Happy Everything by Stampin Up), in Versafine Onyx Black.
.jpeg)
 |
| Final piece before sealing. |
Now for the sealing. I have used beeswax to seal a piece here and there but, normally, I don't seal my pieces. Since I would only seal with a gel medium, I applied a coat to each piece. I am assuming that the first two pieces, since I applied a seal over the Dylusions sprays before applying the paint, that nothing is going to run. I have no idea what is going to happen for Piece 3 or 4 since I did NOT apply a seal on the Dylusions before applying the paints. (Hoping they do not run since I really like these two pieces and want to use them for cards today. LOL).
The results -
Piece 1 - I assumed there would be no bleeding of the Dylusions inks since I did put a coat of gel medium. There was some bleeding of the distress inks, but only minor, and I had a feeling they would. But, because I used a bunch of different colors, it did not bother me in the end.
.jpeg)
Piece 2 - Again, there was a coat of Mod Podge over the Dylusions and they did not bleed. There was also no bleeding of the white acrylic paint. The only issue was that I forgot to wash my brush after the coat on Piece 1 and some of the distress colors did transfer to the white paint sections. The white is not as bright as before.
.jpeg)
Piece 3 - I did not have any bleeding of the Dylusions or of the acrylic paints. Interesting - since I did not seal the Dylusions after I used them and Ranger claims not to have any type of seal for them.
.jpeg)
Piece 4 - As with Piece 3 - no bleeding of the Dylusions or of the paints. So happy as I really love how this came out!!
.jpeg)
This was fun. I forced myself to play with stuff I have - but never use. But I will be using them more now. As for the results, remember, I am not a schooled artist, but, if they worked for me, they should work for you. When in doubt, take a small piece of the paper you are working on, cover it with small amounts of the mediums you are working with, in the order you are working with them, and see if this works - BEFORE you start to apply it to your final piece.
Will post pics of the final cards once done. I hope this was helpful to someone. Please leave comments if you wish!
Thanks!! And Hugs everyone!!
~Michael
The results -
Piece 1 - I assumed there would be no bleeding of the Dylusions inks since I did put a coat of gel medium. There was some bleeding of the distress inks, but only minor, and I had a feeling they would. But, because I used a bunch of different colors, it did not bother me in the end.
Will post pics of the final cards once done. I hope this was helpful to someone. Please leave comments if you wish!
Thanks!! And Hugs everyone!!
~Michael
.jpeg)

.jpeg)
What an awesome experiment and I love the results.
ReplyDeleteThanks MB. Was a lot of fun to do.
DeleteI follow The Frugal Crafter website. She seals stuff (in between products and after) with good old cheap Aqua Net hair spray. I haven't tried it, but I wonder if you have an opinion on this. I asked someone at the Zentangle website if they sprayed a fixative on their work because of shading with pencil. They said no need to, although I would hate to spend a lot of time on a big project only to have the pencil smear. Anyway, what do you think about spray fixatives and hairspray?
ReplyDeleteI will be honest with you. I used to use hair spray when I worked with pastels or chalk. But I have not used them in years and do not have any in the house to do a test with (because I have no hair left - LOL). But, maybe someone else will read this and leave a comment. Thanks for checking out my blog!!
DeleteThanks for all the different testing! It saves a lot of us more time for arting!
ReplyDeleteThanks for visiting Nancy. Huge fan here!!
DeleteWow these turned out awesome! You are an artist and don't tell yourself any different. BTW my birthday is in December....hint, hint.
ReplyDeleteHmmm....My birthday is in December too. the 24th and NO, it is NOT cool and great to have a Christmas Eve birthday!! LOL
DeleteVery helpful, Michael!
ReplyDeleteThank you!!
Thanks Mary!
DeleteMichael, you are an artist! Self trained, nothing wrong with that. Love your art and cards. They turned out great today. The birthday one is especially beautiful.
ReplyDeleteThanks Denise. Appreciate your comment. Took me a long time to tell people I was an artist. Like it was a bad disease or something. LOL
DeleteGreat experiments with sealing spray ink! Rules and directions- are we supposed to follow them?
ReplyDeleteWhat????? we are suppose to follow rules???? hehe
DeleteNo, we do not follow rules. LOL
DeleteThanks Carolyn. And, no, we are NOT supposed to follow rules. LOL
DeleteFour great pieces Michael. Thanks for doing all the leg work for us and with fine results. Your descriptions were so thorough and easy to follow. Thank you for putting it in terms we could understand. hehe I feel inspired to go create something. :0)
ReplyDeleteThanks so much for your comments. Sometimes I think my tutorials are too long and wordy but...I want people to understand exactly what I did and why! Glad this helped you.
DeleteMichael this is so interesting I had to share it with The Gentleman Crafter and Dyan Reavely also
ReplyDeleteThanks TA, glad you did. Going to play with more Dylusions today and see if it keeps working with the gel medium.
DeleteExcellent experiment and tutorial Michael! Thanks!
ReplyDeleteThanks Maria!!
DeleteThank you Michael. You are always ready to offer to help or give advice...you are an artist!
ReplyDeleteThanks!! Really appreciate your comments. I need to keep telling myself that I am an artist.
DeleteYou're the man! Always so sweet, always too humble, always so honest (? maybe? lol), always beautiful art! And the best is that you take time to answer us.....that is a wonderful trait Michael, don't change. We love you, hugs back at ya'! xx
ReplyDeleteThanks so much Gerrie for your comments!! You are too nice. And, yes, I am being honest. LOL.
Deletethese are great projects and good tests of the products. Thanks for sharing.
ReplyDeleteMichael, How dare you not call your self an Artist! We create, we don't need to be art schooled to make beautiful things. Your work is beautiful, you are a great artist to me. The fact that you would also take the time to experiment makes you also a scientist!
ReplyDeleteYour tutorial is NOT too wordy. I am a beginner and really need the steps even when they are obvious to everyone else.
ReplyDeleteThank you.
Great answer to my question on google lol....2 years later ha ha, thanks for all the info, from another untrained artist! Dawn
ReplyDelete