Stamping Scrapping - "Joy" Home Decor Frame
Hello everyone. I've been sick with the flu for the past few days but am finally feeling better to get this blog post done. Today's project is a great way to use the Card Creator dies but NOT on a card. This is a home decor frame. It's very easy to make and very affordable. Frames like the one used in this project are available everyone for very little money - check IKEA, your local Dollar stores, etc. Even your local craft stores have these for very little money (make sure you use a coupon!!).
Supplies Used:
Joy Image by Inkadinkado No. 94601-X
Holly Border from the Christmas Borders set under the Dylusions line by Ranger
Frame 5"x 7" with mat
Piece of chipboard 5" x 7" - if it did not come with the frame
Black cardstock
Red cardstock
White cardstock
Gold Embossing Powder - I used Zing Gold Metallic Finish but you can also use the WOW Embossing Powder in Pale Gold
Pine Green Ink Pad by Marvy. Other great colors to use are Memento Bamboo Leaves, Memento Cottage Ivy, or Memento Northern Pine.
Double Sided Tape
Step by Step:
1. Using your Grand Calibur or other die cut machine, cut and emboss a piece of black cardstock using the largest of the Set A dies; cut and emboss a piece of red cardstock using the largest of the Set B dies, and cut a piece of white cardstock using the 2nd largest die of the Set B set. You want that beautiful embossed edge on each of these pieces.
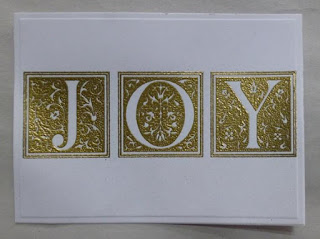
2. Ink up your image with the clear embossing ink, stamp in the center of the white cardstock, and heat emboss with the Gold embossing powder. (Note: you do not want to use the Stampendous Embossing Enamel here as the power is too thick for such a detailed image. Use regular embossing powder).
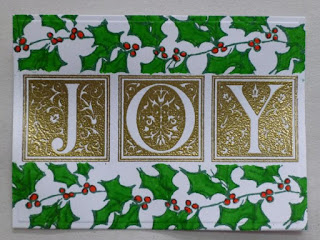
3. Stamp the Holly border image around the Joy image using a dark green ink pad. If need be, cover your Joy image with a piece of scrap paper or a large sticky note and overstamp the holly image.
4. Color the Holly leaves in the Tombow No. 195 (Green) and the berries with Tombow No. 885 (Red) - or use your own colors and/or markers, colored pencils, etc.
5. Adhere the red cardstock to the piece of black cardstock. Then adhere the white stamped cardstock to the red cardstock. Set aside.
Now to emboss the mat. It's so easy!! I do not emboss the whole mat at once. I work in sections. I like using the enamel here because it gives an aged look with the black and gold mixed in. It also spreads thicker when heat set. If you feel you missed spots, after the enamel dries, add more clear embossing ink and then more enamel and re-heat set until you get the look you want. Also, if your mat is beveled on the inside, don't worry about that section as the cardstock will cover it.
If your frame did not come with a mat, cut a piece of chipboard to 5" x 7" and emboss the edges up to the area that the black cardstock will cover.
6. Using your clear embossing ink pad, ink up a portion of the mat, cover with the Stampendous Aged Gold Enamel, remove the excess back into the jar, and then heat set.
7. Then do the next section. The enamel will just melt together without leaving any seams.
8. Adhere the 3 layers of cardstock to the center of your mat, covering the opening. I use heavy duty double sided tape on the back.
9. Because some of the tape was showing in the back, I cut a piece of black cardstock to cover the back side.
10. Adhere the Xmas Red Stickles or Viva Decor Ruby Glitter Liner on the berries. Allow to dry.
11. Remove the glass from the frame and insert your mat in place of it. Put the back of the frame back on and show off on your mantle or give to someone that deserves it!!
.JPG)


.jpeg)
.jpeg)
wow, this is gorgeous Michael! love all the gold color.. love all the details!! so pretty!!
ReplyDeleteHow inspriing! I have to try this!
ReplyDeleteTHANKS for the GREAT step by steps and awesome project!
As always, your work is perfect!
ReplyDeleteBeautiful!
ReplyDeleteBeautiful!
ReplyDeleteYou need to participate in a contest for among the finest blogs on the web. I'll advocate this web site!
ReplyDelete