Welcome to the World of Michael Trent, a crazy American artist living in the countryside of Sao Paulo, Brasil. A person in love with paper, stencils, rubber stamps, and markers. The creator of StenDoodle, a technique that merges stencils with doodling. I hope you enjoy your time in my World!
Wednesday, October 29, 2008
Halloweenie Cards
Tuesday, October 28, 2008
Wednesday, September 3, 2008
Another Great Blog Candy Contest
http://starvingartistamps.blogspot.com/2008/09/delicious-candy-just-in-time-for.html
Good luck everyone.
Tuesday, September 2, 2008
Great Blog - And A Blog Give-A-Way
Today I fell across a pretty neat blog - Paper Imagery Designs. If you love Stampington, Character Construction, Tim Holtz, and altered art, this is the place to stop and stay for a bit. And, Lori is having a one year anniversary blog give-a-way. So if you want a chance to win some great Halloween sheets, as well as Tim Holtz' new Halloween stamps, head over to http://paperimagerydesigns.blogspot.com/ and leave her a comment.
Tomorrow I will try to post some of my favorite foreign blogs for inspiration.
Sunday, April 6, 2008
Faux Suede - My First Tutorial
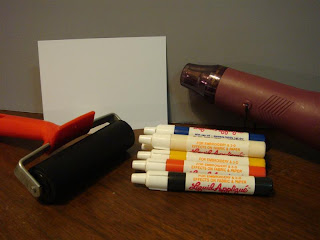
Thank you Julie for allowing me to get this technique out to others. This is my first tutorial so I hope it's okay and understandable. Now, on to what you need to do....
Then, using your brayer, roll the liquid applique across the whole card stock and cover the entire surface. It will not come out perfect and you will have imperfections. I feel this just gives it more of a suede, vintage, or distressed kinda look.
Your card should end up looking like this.
Now use your heat gun to heat the liquid applique until it is set and dry. This will not take long.
This is the finished product. I hope the photo shows the texture of the card. It will look and feel like suede. It's really cool.
Below are some samples I made. I hope you like this technique, use it, and pass it on to others.
Friendship Card
I call this my "friendship card". Paper used was the Hopsack Black & Fossil Square Card Overlay Kit from The Papercut (www.thepapercut.com). I love their papers, the different sizes they cut, and the colors.
Stamp flower image (G165 - KB's Silphium In A Jar from Endless Creations www.shopec.com). I colored the water and flowers with watercolor pencils, coated with a versamark pen, the heat embossed with clear embossing powder. It really makes the colors pop.
Wrap ribbon (from Michael's) around the black cardstock and adhere to front of card.
Stamp the phrase stamp (Flowers In Bloom, FS1119-D from Verses Rubber Stamps (www.versesrubberstamps.com). Use corner ticket punch (Stampin Up) and adhere to front of card - over ribbon.
Here is a cute and fast card. Used the Cuttlebug Stylized Flowers A2 embossing folder (www.provocraft.com), colored in with chalks, added the phrase and adhered to cardstock.
Easter Bunnies
Penguin stamp - Art Impressions, M-3154
Draped Ornaments Slimline Christmas Card | Technique Junkies | BIG SALE!
Hello everyone. I hope y'all are doing well this holiday season. I've been busy giving some album classes to photography clubs a...
-
**Blog Candy Update!! - I have a few more items to my Blog Candy - A 6x6 StencilGirl Stencil called Bird In Window by Pam C...
-
When I was first approached to be part of the StencilGirl/Craft Hoarders Anonymous Challenge blog hop, I just laughed out loud! Me? A ...