Sunday, January 31, 2016

New 30 Day Coloring Challenge with The Daily Marker/Card In A Box and more!


Hello everyone.  It's been a crazy day here.  I managed to finish my first "card in a box" for a customer.  I really love how it came out!  She wants me to teach her how to make one next because she has a client that wants 80!!  My BFF Sue M. made an amazing one for me last year for my {insert gulp here} 50th birthday and I have always wanted to get this off my bucket list.  Not as hard as it looks. Just time consuming.  

Then I made two quick cards using only dies (very easy peasy)!!  For both cards I used a die set by Avery Elle called Custom Panels Elle-ments.  Love this set.  


Start with a piece of white cardstock 4.25" x 5.5". Place the angled die and the "scripty hello" die by Lawn Fawn, on the cardstock, secure with tape if necessary, and run through your die cut machine. The photo on the right will show all the pieces you will end up with. Keep the small pieces that come out of the word "hello" as you will need them.


Next, make an A2 card base with a patterned paper on the front.  Then adhere the piece of white cardstock with the negative "hello" that you just cut and adhere it to the left side of the card front.  Then - carefully - glue in the small pieces from the word. Add a few sequins around the front and you are done.  


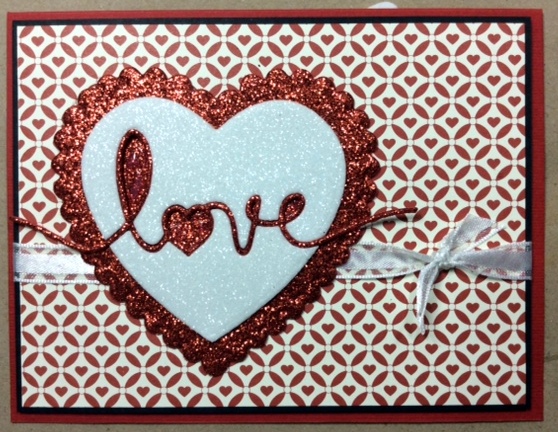
For the other card, I used the same die set from Avery Elle but this time I used the curved die on a piece of patterned paper.  I secured the curved die at the top, allow the white of the card base to be shown across the whole top.  I also secured the "scripty love" die by Lawn Fawn lower on the card front and ran them through my machine.  Again, keep those little pieces from the scripty love die. Then I adhered the patterned paper to my white A2 card base, glued the small pieces from the word "love" into place and added a few sequins. Done!!


And, finally, today I am getting ready for the new 30 Day Coloring Challenge run by Kathy on her blog "The Daily Marker".  


I participated for the first time in October and had so much fun.  There is no stress.  All she asks you to do is to color something, anything, for a few minutes per day, for 30 days. You can color in a doodle, you can make a card, you can start a project that might take a few days to finish....but the idea is to sit, chill, relax, color and fell your blood pressure drop.  LOL. If you missed it the last time, or the time before that, you can join me on this one.  You can find all the details HERE!!!

I hope you enjoyed the cards today and I hope you join me on the coloring challenge!! Now, I am off to start stamping some images and getting ready!  

Until next time - 
Hugs from Brasil - 

Michael

Saturday, January 30, 2016

Stamp Ink Paper Tic-Tac-Toe Challenge - Valentine's Day Cards


Hello everyone.  Sorry it's been some time since my last post but this thing called "life" keeps getting in my way of being creative!!  LOL.  And it's starting to piss me off.  It's taken me 3 days to even get this post done!!  But I am back today to show you an easy card I made for the Stamp Ink Paper Challenge 32 - Tic-Tac-Toe!  I love tic-tac-toe challenges because it gives you so many options to choose from. Here is what the challenge was -


What will you need to make this card

Other than your basic tool kit, you will need an A2 red card base (8.5" x 5.5", scored at 4.25"), a piece of black cardstock (4"x 5.25"), a piece of black fun foam (3 15/16" x 5 3/16"), a piece of patterned valentine paper (3 7/8" x 5 1/8"), the 2nd largest scallop heart die from the Xpress Nesting Dies Scalloped Heart set, the 3rd largest plain heart die from the Xpress Nesting Dies Heart set, {you can use other heart dies but please use dies that will nest within each other}, and the Big Handwritten Love die by Frantic Stamper, a piece of ribbon, red glittered fun foam, and white glittered fun foam. {you can also use glitter paper if you wish}.


How to make the card

1.  Adhere the (a) patterned paper to the black cardstock, (b) the black fun foam to the back of the black cardstock, (c) tie the ribbon around all 3 layers and make a knot or bow, and (d) adhere this all to the card front.  


2.  Using your diecut machine - (a) cut the scallop heart and the word "love" with the red glittered fun foam, and (b) the regular/smaller heart with white glittered fun foam. {Again, you can use glittered paper or cardstock if you wish.}  Note: do NOT throw out the small pieces from the word "love" - you will use them.


3.  Place the "love" die on top of the white plain heart that you cut from the glittered fun foam and diecut with your machine.  


4.  This is what you should have in front of you.


5.  Now glue the large red glittered hear to the card front.

 
6.  Glue the two halves of the white heart to the red heart - leaving room for the word "love".  You can also include the red "love" that you diecut in step 2 if you so want.   


7.  Now glue down the word "love" from the red glittered fun foam that you diecut in Step 2.  If you did this in Step 6, disregard this step.


8.  Finally, take the small pieces from the white "love" that you die cut and glue them down into the sections of the word love.


You're done!!  In order to use the white word "love" that from Step 4, I made another quick card.  This card is 4" square.  I used a different patterned paper and reversed the colors of the two hearts.  The white heart pops better against the red paper and I used the white "love" in the red heart.  Both very easy cards to make!


I hope you guys liked this post.  Please let me know by leaving a comment, follow my blog, friend me on Facebook....until next time...

Hugs from Brasil - 

Michael 

Friday, January 1, 2016

2016 Card 1 - Thank Thank Thank You with Concord & 9th


Hello everyone!  I hope everyone had a great New Year's Eve!  Welcome to 2016!  It pretty much rained all day yesterday but it did stop close to midnight so that we could watch fireworks from the back terrace. Today I woke up to some beautiful sun but now....it's raining again.  This time last year Sao Paulo was under a major H2O shortage so I won't complain too much about the excess rain we are getting this year. 

Now...for my first card of 2016...Stamp Ink Paper is having their last card challenge of 2015 and it's an Anything But Christmas challenge.  A few weeks ago I made this card for their "Thanks" challenge using a stamp from Concord & 9th.   Another idea popped into my head that is perfect to enter into the SIP (Stamp Ink Paper) Challenge No. 28 - Anything But Christmas challenge!   It's open until tomorrow night and I hope you will enter a card too!

I used the "Painted Thank You" stamp from Concord & 9th again - but with a twist. Shhhhh...I cut the stamp in half.  Don't tell them.  LOL. Yes, I could have used sticky notes to mask them but it was easier to just cut the two words apart and, this way, I can use the phrase horizontally too.   


I started with a top folding card base of red textured cardstock, 4.25" x 11", scored at 5.5".  Then I die cut a piece of green cardstock using the large rectangle die from the Simon Says Stamp Bundle of Stitched Shapes set.   Then I cut a piece of green fun foam 4" x 5.25" and adhered it to the back of the green cardstock.  This I then adhered to the card front.  

Next up I cut a piece of white cardstock, 3.75" x 5", and then I stamped the word "thank", 3 times, each time using a different Ombre ink from Hero Arts. From top to bottom, below, Pink to Red (AF306), Mint to Green (AF310), then Butter to Orange (AF309).


Then I cut another piece of white cardstock, 3.75" x 5", and stamped the word "you" using the Light Ruby to Royal Red Ombre Ink by Hero Arts.


You will end up with these 3 sections - the front of the card, the card base, and the inside of the card.


Now adhere the white cardstock with the word "thank" to the card front and the piece with the word "you" to the inside of the card.  


Done!!  I was debating about adhering some sequins to the front but I love that the focus is on the word and the beautiful Ombre colors and that nothing else was really needed. This is a very CAS (clean and simple) card and very easy to make.  Let me know what you think.

I hope you enjoyed this easy card and I wish everyone has a fantastic, healthy, prosperous, and ART FILLED 2016!!  Until next time - 

Hugs from Brasil!
~Michael

Happy (Pizza) Pi Day | Sketch Challenge 19 with Tawny Owl Paperie | Inky Inspriation

Hello everyone and Happy Pi Day.  For many, Pi means 3.14 or 3.141592653589793238462643383279502884197.  But, for crazy cardmakers like me, ...